


 Now you can get the latest Java source bundled with each app update. Install the app from Google Play and go to Settings > Extras.
Create a game like Flappy Bird in Android using AndEngine
 Download
Keywords: AndEngine AndEnginePhysicsBox2DExtension SimpleBaseGameActivity ResourceManager SceneManager MenuScene CameraScene AutoParallaxBackground AnimatedSprite DynamicSpriteBatch TiledSprite Sound Music HUD Font PhysicsHandler GenericPool PhysicsWorld Fixture Body ContactListener
Contents- Overview
- Create a new Eclipse Android project
- Add AndEngine library
- Add AndEngine Physics Box2D extension
- Android manifest
- AndEngine concepts
- Game Activity
- Resource Manager
- TextureAtlas & TextureRegion
- Font
- Sound & Music
- Scene Manager
- Base Scene
- Splash Scene
- Main Menu Scene
- Sub Menu Scene
- Game Scene
- Auto Parallax Background
- HUD
- Bird
- Pipes
- Generic Pool
- Physics World
- Body & Fixture
- Contact Listener
- Camera Scene
- What's next?
26. Camera Scene
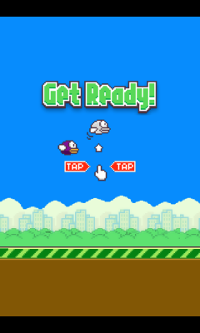 CameraScene is a subclass of Scene. We will use it for creating 'Get Ready' and 'Game Over' child scenes.
Let's take a look at the modifications to the GameScene class for displaying Get Ready child scene.
	private CameraScene mGameReadyScene;

	@Override
	public void createScene() {
		//...

		final float labelX = (SCREEN_WIDTH - mResourceManager.mStateTextureRegion.getWidth()) / 2;
		final float labelY = 100;

		//create CameraScene for get ready
		final float readyX = (SCREEN_WIDTH - mResourceManager.mResumedTextureRegion.getWidth()) / 2;
		final float readyY = overY;

		mGameReadyScene = new CameraScene(mCamera);
		final TiledSprite label2Sprite = new TiledSprite(labelX, labelY, mResourceManager.mStateTextureRegion, mVertexBufferObjectManager);
		label2Sprite.setCurrentTileIndex(0);
		mGameReadyScene.attachChild(label2Sprite);
		final Sprite resumedSprite = new Sprite(readyX, readyY, mResourceManager.mResumedTextureRegion, mVertexBufferObjectManager);
		mGameReadyScene.attachChild(resumedSprite);

		mGameReadyScene.setBackgroundEnabled(false);

		mGameReadyScene.setOnSceneTouchListener(new IOnSceneTouchListener() {

			@Override
			public boolean onSceneTouchEvent(Scene pScene, TouchEvent pSceneTouchEvent) {
				if (pSceneTouchEvent.isActionUp()) {
					clearChildScene();
					mHudText.setVisible(true);
				}
				return true;
			}
		});

		setChildScene(mGameReadyScene, false, true, true);

		//...

	}
We attach sprites to camera scene just like for normal scene and set a touch listener so when user touches the screen we clear the child scene and the game scene resumes. Also, note that when game scene starts it displays get ready scene since it is set as child scene.
We'll next implement the Game Over child scene.
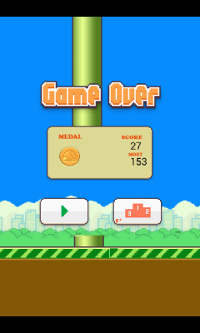 The game over scene displays buttons as well as info like score, max. score, medal. Let's take a look at the changes.
	private CameraScene mGameOverScene;
	private Text scoreText;
	private Text mostText;
	private TiledSprite medalSprite;

	@Override
	public void createScene() {
		//...

		//create CameraScene for game over
		final float overX = (SCREEN_WIDTH - mResourceManager.mPausedTextureRegion.getWidth()) / 2;
		final float overY = labelY + mResourceManager.mStateTextureRegion.getHeight();

		final float playX = overX;
		final float playY = overY + mResourceManager.mPausedTextureRegion.getHeight();

		final float posX = SCREEN_WIDTH/2;
		final float posY = playY;

		final float medalX = overX + 46;
		final float medalY = overY + 46;

		final float scoreX = overX + 165;
		final float scoreY = overY + 40;

		final float mostX = scoreX;
		final float mostY = scoreY + 25;

		mGameOverScene = new CameraScene(mCamera);

		final TiledSprite labelSprite = new TiledSprite(labelX, labelY, mResourceManager.mStateTextureRegion, mVertexBufferObjectManager);
		labelSprite.setCurrentTileIndex(1);
		mGameOverScene.attachChild(labelSprite);

		final Sprite pauseSprite = new Sprite(overX, overY, mResourceManager.mPausedTextureRegion, mVertexBufferObjectManager);
		pauseSprite.setScale(0.75f);
		mGameOverScene.attachChild(pauseSprite);

		medalSprite = new TiledSprite(medalX, medalY, mResourceManager.mMedalTextureRegion, mVertexBufferObjectManager);
		medalSprite.setCurrentTileIndex(0);
		medalSprite.setScale(0.75f);
		mGameOverScene.attachChild(medalSprite);

		scoreText = new Text(scoreX, scoreY, mResourceManager.mFont4, "0123456789", new TextOptions(HorizontalAlign.LEFT), mVertexBufferObjectManager);
		scoreText.setText("0");
		mGameOverScene.attachChild(scoreText);

		mostText = new Text(mostX, mostY, mResourceManager.mFont4, "0123456789", new TextOptions(HorizontalAlign.LEFT), mVertexBufferObjectManager);
		mostText.setText(String.valueOf(most));
		mGameOverScene.attachChild(mostText);

		final TiledSprite playSprite = new TiledSprite(playX, playY, mResourceManager.mButtonTextureRegion, mVertexBufferObjectManager) {

			@Override
			public boolean onAreaTouched(TouchEvent pSceneTouchEvent, float pTouchAreaLocalX, float pTouchAreaLocalY) {
				if (pSceneTouchEvent.isActionUp()) {
					clearChildScene();
					mSceneManager.setScene(SceneType.SCENE_GAME);
				}
				return true;
			}
		};
		playSprite.setCurrentTileIndex(0);
		playSprite.setScale(0.75f);
		mGameOverScene.registerTouchArea(playSprite);
		mGameOverScene.attachChild(playSprite);

		final TiledSprite posSprite = new TiledSprite(posX, posY, mResourceManager.mButtonTextureRegion, mVertexBufferObjectManager);
		posSprite.setCurrentTileIndex(1);
		posSprite.setScale(0.75f);
		mGameOverScene.registerTouchArea(posSprite);
		mGameOverScene.attachChild(posSprite);

		mGameOverScene.setBackgroundEnabled(false);

		//...

	}
We do the usual stuff of creating sprites and attaching them to the scene. Additionally, we've overridden onAreaTouched() method of play sprite to make it behave as a button. So when user touches the play button we clear the game over child scene and set back to game scene.
As mentioned previously, it's better to reset a scene and reuse it. However, for simplicity we recreate the scene in SceneManager.
Recall that we need to make changes in contact listener as well to display the game over child scene.
	private ContactListener createContactListener() {
		ContactListener contactListener = new ContactListener() {
			@Override
			public void beginContact(Contact pContact) {
					//...

					//display game over with score
					scoreText.setText(String.valueOf(score));
					mostText.setText(String.valueOf(most));
					medalSprite.setCurrentTileIndex(score>100 ? 3 : (score>50 ? 2 : (score>10 ? 1 : 0)));
					setChildScene(mGameOverScene, false, true, true);
				}
			}

			@Override
			public void endContact(Contact contact) {
			}

			@Override
			public void preSolve(Contact contact, Manifold oldManifold) {
			}

			@Override
			public void postSolve(Contact contact, ContactImpulse impulse) {
			}
		};
		return contactListener;
	}
So when the bird collides with the ground we display game over with score.