


 Now you can get the latest Java source bundled with each app update. Install the app from Google Play and go to Settings > Extras.
Create a currency converter application using Yahoo! API
 Download
Keywords: ConnectivityManager HttpGet XmlPullParser SAXParser SimpleCursorAdapter SQLiteDatabase ContentProvider SQLiteQueryBuilder BroadcastReceiver IntentService AChartEngine Search Dialog Animation TableLayout
Contents
- Overview
- Create a new Eclipse Android project
- Define the Data model
- The Android Manifest file
- The Application class
- Create a Preferences screen
- Implement the Init Task
- The Yahoo! Finance API
- The XmlPullParser
- The SAX Parser
- Calling RESTful service
- Implement the Data Service
- Create a splash screen
- Create the Main screen
- The Search Dialog
- Create the Info screen
- The AChartEngine library
13. Create a splash screen
Let's create a splash screen for the application since we need to perform initialization of the database tables before the app is ready for use. The splash screen is displayed only once so we have kept it simple in design. Here is the layout file.
	<?xml version="1.0" encoding="utf-8"?>
	<RelativeLayout xmlns:android="http://schemas.android.com/apk/res/android"
		android:layout_width="fill_parent"
		android:layout_height="fill_parent">

		<TextView
			android:id="@+id/textView1"
			android:layout_width="wrap_content"
			android:layout_height="wrap_content"
			android:layout_centerHorizontal="true"
			android:layout_centerVertical="true"
			android:shadowDx="1"
			android:shadowDy="1"
			android:shadowRadius="1"
			android:shadowColor="@color/shadow"
			android:textSize="@dimen/large"
			android:textColor="@color/brown"
			android:text="@string/app_name" />

		<TextView
			android:id="@+id/textView2"
			android:layout_width="wrap_content"
			android:layout_height="wrap_content"
			android:layout_below="@id/textView1"
			android:layout_centerHorizontal="true"
			android:textColor="@color/gray"
			android:text="@string/loading" />

	</RelativeLayout>
The font is not specified in the layout as it is done in the activity by loading a custom font from the assets directory. Here is the code for SplashActivity class.
	public class SplashActivity extends Activity {
		private Typeface font;
		private InitTask init;
		private TextView tv1;

		@Override
		protected void onCreate(Bundle savedInstanceState) {
			super.onCreate(savedInstanceState);
			requestWindowFeature(Window.FEATURE_NO_TITLE);

			if (ForexWiz.isInitialized()) {
				startActivity(new Intent(this, MainActivity.class));
				finish();
			} else {
				init = new InitTask(getApplicationContext());
				init.execute();
			}

			setContentView(R.layout.splash);
			tv1 = (TextView) findViewById(R.id.textView1);

			font = Typeface.createFromAsset(getAssets(), "fonts/OpenSans.ttf");
			tv1.setTypeface(font);
		}

		@Override
		protected void onResume() {
			super.onResume();
			registerReceiver(initStatusReceiver, new IntentFilter(Constants.ACTION_INIT));
		}

		@Override
		protected void onPause() {
			unregisterReceiver(initStatusReceiver);
			super.onPause();
		}

		private BroadcastReceiver initStatusReceiver = new  BroadcastReceiver() {

			@Override
			public void onReceive(Context context, Intent intent) {
				if (intent != null && Constants.ACTION_INIT.equals(intent.getAction())) {
					switch (intent.getIntExtra(Constants.EXTRA_STATUS, 100)) {
					case Constants.STATUS_SUCCESS:
						runOnUiThread(new Runnable() {
							@Override
							public void run() {
								startActivity(new Intent(SplashActivity.this, MainActivity.class));
								finish();
							}
						});
						break;

					case Constants.STATUS_FAILED:
						Toast.makeText(context, getString(R.string.init_failed), Toast.LENGTH_SHORT).show();
						finish();
						break;
					}
				}
			}
		};
	}
We execute the InitTask here which we implemented earlier. Also we register a BroadcastReceiver to listen to the broadcast sent by InitTask based on which proceed to the main screen or exit the application.
Finishing an Activity in the onCreate() method before calling setContentView() has the effect that the layout is not loaded and won't be displayed.
Finally, we need to declare the activity in the manifest.<activity android:name=".SplashActivity" android:screenOrientation="portrait" android:configChanges="orientation" android:windowSoftInputMode="stateAlwaysHidden"> <intent-filter> <action android:name="android.intent.action.MAIN" /> <category android:name="android.intent.category.LAUNCHER" /> </intent-filter> </activity>
14. Create the Main screen
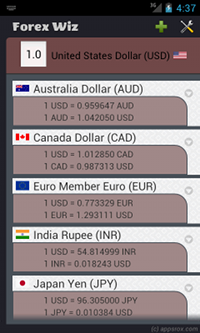 The layout essentially contains three sections. Here is an outline of the file.
	<LinearLayout xmlns:android="http://schemas.android.com/apk/res/android"
		android:layout_width="fill_parent"
		android:layout_height="fill_parent"
		android:orientation="vertical">

		<RelativeLayout
			android:layout_width="fill_parent"
			android:layout_height="wrap_content" >
			<TextView
				android:id="@+id/heading_tv"
				android:layout_width="wrap_content"
				android:layout_height="wrap_content"
				android:layout_alignParentLeft="true"
				android:layout_centerVertical="true"
				android:text="@string/app_name" />

			<ImageView
				android:id="@+id/process_iv"
				android:layout_width="wrap_content"
				android:layout_height="wrap_content"
				android:layout_centerVertical="true"
				android:layout_toRightOf="@id/heading_tv"
				android:visibility="invisible"
				android:src="@drawable/wheel" />

			<ImageButton
				android:id="@+id/settings_btn"
				android:layout_width="wrap_content"
				android:layout_height="wrap_content"
				android:layout_alignParentRight="true"
				android:layout_centerVertical="true"
				android:onClick="onClick"
				android:background="@null"
				android:src="@drawable/system" />

			<ImageButton
				android:id="@+id/add_btn"
				android:layout_width="wrap_content"
				android:layout_height="wrap_content"
				android:layout_centerVertical="true"
				android:layout_toLeftOf="@id/settings_btn"
				android:onClick="onClick"
				android:background="@null"
				android:src="@drawable/plus" />
		</RelativeLayout>

		<LinearLayout
			android:layout_width="wrap_content"
			android:layout_height="wrap_content"
			android:layout_alignParentTop="true"
			android:layout_centerHorizontal="true"
			android:gravity="center_vertical">
			<EditText
				android:id="@+id/base_et"
				android:layout_width="wrap_content"
				android:layout_height="wrap_content"
				android:maxEms="5"
				android:inputType="numberDecimal" >
			</EditText>

			<Spinner
				android:id="@+id/base_spn"
				android:layout_width="wrap_content"
				android:layout_height="wrap_content"
				android:background="@null"
				android:entries="@array/base_entries"
				android:prompt="@string/base_prompt" />

			<ImageButton
				android:id="@+id/base_btn"
				android:layout_width="wrap_content"
				android:layout_height="wrap_content"
				android:onClick="onClick"
				android:background="@null" />
		</LinearLayout>

		<LinearLayout
			android:id="@+id/list_view"
			android:layout_width="fill_parent"
			android:layout_height="0dp"
			android:layout_weight="1"
			android:orientation="vertical" >
			<ListView android:id="@android:id/list"
					  android:layout_width="fill_parent"
					  android:layout_height="fill_parent"
					  android:divider="@android:color/transparent"
					  android:dividerHeight="5dp"
					  android:listSelector="@android:color/transparent"
					  android:cacheColorHint="#00000000"
					  android:drawSelectorOnTop="false" />

			<TextView android:id="@android:id/empty"
					  android:layout_width="fill_parent"
					  android:layout_height="fill_parent"
					  android:gravity="center"
					  android:text="@string/no_data" />
		</LinearLayout>
	</LinearLayout>
We have discussed about styling a layout using shape drawables, tiling background images, text shadows, etc. in our previous tutorials which you can browse here.
Let's take a look at the custom layout for the list view rows.
	<?xml version="1.0" encoding="utf-8"?>
	<RelativeLayout xmlns:android="http://schemas.android.com/apk/res/android"
		android:layout_width="fill_parent"
		android:layout_height="wrap_content">

		<TextView
			android:id="@+id/text1"
			android:layout_width="fill_parent"
			android:layout_height="wrap_content"
			android:layout_alignParentLeft="true"
			android:layout_alignParentTop="true" />

		<ImageView
			android:id="@+id/more"
			android:layout_width="wrap_content"
			android:layout_height="wrap_content"
			android:layout_alignParentRight="true"
			android:layout_alignParentTop="true"
			android:clickable="true"
			android:onClick="onClick"
			android:src="@drawable/ic_btn_round_more" />

		<LinearLayout
			android:layout_width="fill_parent"
			android:layout_height="wrap_content"
			android:orientation="vertical"
			android:layout_below="@id/text1" >
			<TextView
				android:id="@+id/text2"
				android:layout_width="wrap_content"
				android:layout_height="wrap_content" />

			<TextView
				android:id="@+id/text3"
				android:layout_width="wrap_content"
				android:layout_height="wrap_content" />
		</LinearLayout>
	</RelativeLayout>
Next we'll implement activity for the main screen.