


 Now you can get the latest Java source bundled with each app update. Install the app from Google Play and go to Settings > Extras.
Create a SMS application with power features
 Download
Keywords: ContentResolver SmsManager AsyncTask ProgressDialog BroadcastReceiver ListActivity AlertDialog Shape drawable PreferenceActivity
Contents
- Overview
- Create a new Eclipse Android project
- The Android Manifest file
- Application Theme
- The Application class
- The Preferences screen
- The Main screen
- SMS Export AsyncTask
- Reading SMS
- Sending SMS
6. The Preferences screen
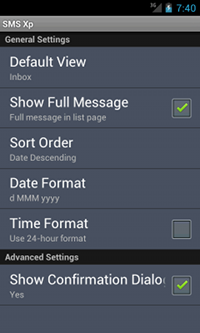 Android provides an easy means to implement preferences screen. Create a xml file (for ex. settings.xml) under res/xml directory using predefined preferences for ex. ListPreference, CheckBoxPreference.
	<?xml version="1.0" encoding="utf-8"?>
	<PreferenceScreen xmlns:android="http://schemas.android.com/apk/res/android" >

		<PreferenceCategory android:title="General Settings">

			<CheckBoxPreference android:key="full_sms"
				android:title="Full SMS"
				android:summary="Show full SMS message"
				android:defaultValue="true" />

			<ListPreference android:key="default_sort"
				android:title="Sort Order"
				android:summary="Date Descending"
				android:entries="@array/sort_opts_arr"
				android:entryValues="@array/val_arr"
				android:defaultValue="3" />

			<CheckBoxPreference android:key="time_format"
				android:title="Time Format"
				android:summary="Use 24-hour format"
				android:defaultValue="false" />

		</PreferenceCategory>

		<PreferenceCategory android:title="Advanced Settings">

			<CheckBoxPreference android:key="confirm_pref"
				android:title="Ask for Confirmation"
				android:summary="Show confirmation dialog"
				android:defaultValue="true" />

			<CheckBoxPreference android:key="use_default"
				android:title="Use System App"
				android:summary="Application for sending SMS"
				android:defaultValue="true" />

		</PreferenceCategory>

	</PreferenceScreen>
Notice that for ListPreference we need to specify an array for entries and entryValues. For this we create an xml file arrays.xml under res/values directory.
	<?xml version="1.0" encoding="utf-8"?>
	<resources>
		<string-array name="sort_opts_arr">
			<item>Sender Ascending</item>
			<item>Sender Descending</item>
			<item>Date Ascending</item>
			<item>Date Descending</item>
		</string-array>
		<string-array name="val_arr">
			<item>0</item>
			<item>1</item>
			<item>2</item>
			<item>3</item>
		</string-array>
	</resources>
Next, create a new activity and make it extend PreferenceActivity. Additionally, we will implement OnSharedPreferenceChangeListener interface to do our stuff when a preference value gets changed.
	public class SettingsActivity extends PreferenceActivity
									implements OnSharedPreferenceChangeListener {

		@Override
		public void onCreate(Bundle savedInstanceState) {
			super.onCreate(savedInstanceState);
			addPreferencesFromResource(R.xml.settings);
		}

		@Override
		protected void onResume(){
			super.onResume();
			getPreferenceScreen().getSharedPreferences()
									.registerOnSharedPreferenceChangeListener(this);
		}

		@Override
		protected void onPause() {
			super.onPause();
			getPreferenceScreen().getSharedPreferences()
									.unregisterOnSharedPreferenceChangeListener(this);
		}

		@Override
		public void onSharedPreferenceChanged(SharedPreferences sharedPreferences, String key) {
			Preference pref = findPreference(key);

			if (pref instanceof ListPreference) {
				ListPreference listPref = (ListPreference) pref;
				pref.setSummary(listPref.getEntry());
				return;
			}
		}
	}
We have overridden onSharedPreferenceChanged() method to set summary of the list preference when its value is changed by user.
7. The Main screen
The main screen consists of a header and toolbar at the top, and a list view below.Here is the basic structure of main.xml layout file.
	<?xml version="1.0" encoding="utf-8"?>
	<LinearLayout xmlns:android="http://schemas.android.com/apk/res/android"
		android:layout_width="fill_parent"
		android:layout_height="fill_parent"
		android:orientation="vertical" >

		<RelativeLayout
			android:layout_width="fill_parent"
			android:layout_height="wrap_content"
			android:background="@color/bg" >

		</RelativeLayout>

		<RelativeLayout
			android:layout_width="fill_parent"
			android:layout_height="wrap_content"
			android:background="@drawable/bar"
			android:layout_marginBottom="10dip" >

		</RelativeLayout>

		<LinearLayout
			android:id="@+id/list_view"
			android:layout_width="fill_parent"
			android:layout_height="0dip"
			android:layout_weight="1"
			android:orientation="vertical" >

			<ListView android:id="@android:id/list"
					  android:layout_width="fill_parent"
					  android:layout_height="fill_parent"
					  android:listSelector="@android:color/transparent"
					  android:cacheColorHint="#00000000"
					  android:drawSelectorOnTop="false" />

			<TextView android:id="@android:id/empty"
					  android:layout_width="fill_parent"
					  android:layout_height="fill_parent"
					  android:gravity="center"
					  android:textColor="#777777"
					  android:text="No data" />

		</LinearLayout>

	</LinearLayout>
As you might have guessed, the header section is just a simple RelativeLayout containing TextView and ImageButton. Similarly, the toolbar contains just a bunch of ImageButtons.
	<TextView
		android:id="@+id/heading_tv"
		android:layout_width="wrap_content"
		android:layout_height="wrap_content"
		android:layout_alignParentLeft="true"
		android:shadowDx="1"
		android:shadowDy="1"
		android:shadowRadius="1"
		android:shadowColor="#111111"
		android:textSize="22sp"
		android:textColor="#cccccc"
		android:text="@string/app_name" />

	<ImageButton
		android:id="@+id/imageButton1"
		android:layout_width="wrap_content"
		android:layout_height="wrap_content"
		android:layout_alignParentRight="true"
		android:onClick="onClick"
		android:background="@null"
		android:src="@drawable/gear" />
We can achieve various text effects using shadow related attributes on a TextView. You may want to try out various values for these attributes.
Notice in the screnshot we used custom font for the app name which is not apparent from the layout file since it is done programmatically.
Next we will implement the Activity for this screen and see how to use custom fonts in an application.