


 Now you can get the latest Java source bundled with each app update. Install the app from Google Play and go to Settings > Extras.
Accelerometer sensor example in Android
 Download
Keywords: SensorEventListener Sensor SensorManager WakeLock PowerManager Display WindowManager BitmapFactory Bitmap Canvas
Contents- AccelerometerGolf
- res
- layout
- activity_main.xml
- drawable-hdpi
- ball.png
- grass.jpg
- hole.png
- drawable-mdpi
- ic_launcher.png
- values
- dimens.xml
- strings.xml
- styles.xml
- layout
- libs
- android-support-v4.jar
- src
- appsrox
- example
- accelerometer
- Particle.java
- SimulationView.java
- MainActivity.java
- accelerometer
- example
- appsrox
- AndroidManifest.xml
- res
1. Overview
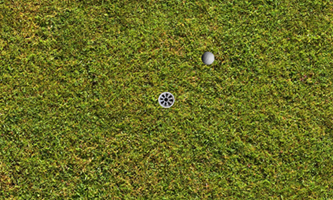
In this tutorial we show how to read accelerometer sensor data on your device. Reading sensor data in Android is pretty straightforward as it involves implementing the SensorEventListener interface. However, there are few details about interpreting the data based on device orientation that we'll discuss.Moreover, to make things interesting we use the aceleration values to move a golf ball on the screen.
 There are many more possibilities once you get hold of accelerometer data on your device. So let's see what all is needed to make this simple example work.
2. Create a new Eclipse Android project
In Eclipse, go to File > New > Project and in the New Project dialog, expand Android folder to select Android Project.In New Android Project dialog enter the project details as follows.
Application Name: Accelerometer Golf
Project Name: AccelerometerGolf
Package Name: appsrox.example.accelerometer
Minimum Required SDK: API 8
Compile With: API 8
Accept the defaults and click Next, Next, Next, Finish. The project gets created in your workspace.
3. The Android Manifest file
Add the necessary permission and feature to the manifest. We'll make use of wake lock to keep the screen on.
    <uses-permission android:name="android.permission.WAKE_LOCK"></uses-permission>
    <uses-feature android:name="android.hardware.sensor.accelerometer" />
Also we would like to make the activity full screen in portrait mode. So edit the <activity> element as follows.
	<activity
		android:name="appsrox.example.accelerometer.MainActivity"
		android:label="@string/app_name"
		android:screenOrientation="portrait"
		android:theme="@android:style/Theme.NoTitleBar.Fullscreen" >
		<intent-filter>
			<action android:name="android.intent.action.MAIN" />
			<category android:name="android.intent.category.LAUNCHER" />
		</intent-filter>
	</activity>
4. The Main Activity
In the activity, acquire the wake lock in onResume() and release it in onPause(). This ensures optimum utilization of system resources.
	public class MainActivity extends Activity {

		private static final String TAG = "appsrox.example.accelerometer.MainActivity";

		private WakeLock mWakeLock;
		private SimulationView mSimulationView;

		@Override
		protected void onCreate(Bundle savedInstanceState) {
			super.onCreate(savedInstanceState);

			PowerManager mPowerManager = (PowerManager) getSystemService(POWER_SERVICE);
			mWakeLock = mPowerManager.newWakeLock(PowerManager.SCREEN_BRIGHT_WAKE_LOCK, TAG);
		}

		@Override
		protected void onResume() {
			super.onResume();
			mWakeLock.acquire();
		}

		@Override
		protected void onPause() {
			super.onPause();
			mWakeLock.release();
		}
	}
We use SCREEN_BRIGHT_WAKE_LOCK for our purpose since we want the screen to be bright while it is on.
We'll next create a custom view for the activity which would also act as a listener for the sensor data.
5. The Simulation View
Create a custom view by extending View and make it implement the SensorEventListener interface.
	public class SimulationView extends View implements SensorEventListener {

		private SensorManager mSensorManager;
		private Sensor mAccelerometer;
		private Display mDisplay;

		private Bitmap mGrass;
		private Bitmap mHole;
		private Bitmap mBitmap;
		private static final int BALL_SIZE = 32;
		private static final int HOLE_SIZE = 40;

		private float mXOrigin;
		private float mYOrigin;
		private float mHorizontalBound;
		private float mVerticalBound;

		public SimulationView(Context context) {
			super(context);

			Bitmap ball = BitmapFactory.decodeResource(getResources(), R.drawable.ball);
			mBitmap = Bitmap.createScaledBitmap(ball, BALL_SIZE, BALL_SIZE, true);

			Bitmap hole = BitmapFactory.decodeResource(getResources(), R.drawable.hole);
			mHole = Bitmap.createScaledBitmap(hole, HOLE_SIZE, HOLE_SIZE, true);

			Options opts = new Options();
			opts.inDither = true;
			opts.inPreferredConfig = Bitmap.Config.RGB_565;
			mGrass = BitmapFactory.decodeResource(getResources(), R.drawable.grass, opts);
		}

		@Override
		protected void onSizeChanged(int w, int h, int oldw, int oldh) {
			mXOrigin = w * 0.5f;
			mYOrigin = h * 0.5f;

			mHorizontalBound = (w - BALL_SIZE) * 0.5f;
			mVerticalBound = (h - BALL_SIZE) * 0.5f;
		}
	}
The implementation till now just creates the basic resources required for drawing on the screen. Notice that we haven't yet implemented the callbacks for SensorEventListener which we'll do next.
6. Reading Accelerometer data
Implement onSensorChanged() and onAccuracyChanged() methods of SensorEventListener in the SimulationView class.
	private float mSensorX;
	private float mSensorY;
	private float mSensorZ;
	private long mSensorTimeStamp;

	@Override
	public void onSensorChanged(SensorEvent event) {
        if (event.sensor.getType() != Sensor.TYPE_ACCELEROMETER)
            return;

		switch (mDisplay.getRotation()) {
		case Surface.ROTATION_0:
			mSensorX = event.values[0];
			mSensorY = event.values[1];
			break;
		case Surface.ROTATION_90:
			mSensorX = -event.values[1];
			mSensorY = event.values[0];
			break;
		case Surface.ROTATION_180:
			mSensorX = -event.values[0];
			mSensorY = -event.values[1];
			break;
		case Surface.ROTATION_270:
			mSensorX = event.values[1];
			mSensorY = -event.values[0];
			break;
		}
		mSensorZ = event.values[2];
		mSensorTimeStamp = event.timestamp;
	}

	@Override
	public void onAccuracyChanged(Sensor sensor, int accuracy) {

	}
We get the acceleration values along the three axis from event.values array and timestamp of the data from event.timestamp.
The sensor values are relative to the natural orientation of the device. But the display orientation may differ from the device orientation. e.g. If you rotate your phone the system will reorient the display into portrait or landscape mode.
Note that we had specified portrait mode for the MainActivity in the manifest so system won't reorient the display. However, for some devices e.g. tablets the natural orientation of the device could be landscape mode. So its important to put logic as we have done to interpret the sensor data properly.Add the following lines of code in the SimulationView constructor to initialize display and sensor.
	WindowManager mWindowManager = (WindowManager) context.getSystemService(Context.WINDOW_SERVICE);
	mDisplay = mWindowManager.getDefaultDisplay();

	mSensorManager = (SensorManager) context.getSystemService(Context.SENSOR_SERVICE);
	mAccelerometer = mSensorManager.getDefaultSensor(Sensor.TYPE_ACCELEROMETER);
Now we are all set to start listening for sensor data but before that we need to register the listener. Add these two methods in the SimulationView class.
	public void startSimulation() {
		mSensorManager.registerListener(this, mAccelerometer, SensorManager.SENSOR_DELAY_UI);
	}

	public void stopSimulation() {
		mSensorManager.unregisterListener(this);
	}
We invoke these methods from the MainActivity so that the simulation is aligned with the lifecycle of the activity. Also we set SimulationView as the content view for the activity. Modify the MainActivity class as follows.
	@Override
	protected void onCreate(Bundle savedInstanceState) {
		// ...

        mSimulationView = new SimulationView(this);
        setContentView(mSimulationView);
	}

	@Override
	protected void onResume() {
		super.onResume();
		mWakeLock.acquire();
		mSimulationView.startSimulation();
	}

	@Override
	protected void onPause() {
		super.onPause();
		mSimulationView.stopSimulation();
		mWakeLock.release();
	}
We have completed all work required to read accelerometer data. Next we will use the data to run simulation on the screen.
7. Drawing on the screen
Create a class to implement the behavior of an accelerating particle in a bounded region.
	public class Particle {
		/* coefficient of restitution */
		private static final float COR = 0.7f;

		public float mPosX;
		public float mPosY;
		private float mVelX;
		private float mVelY;

		public void updatePosition(float sx, float sy, float sz, long timestamp) {
			float dt = (System.nanoTime() - timestamp) / 1000000000.0f;
			mVelX += -sx * dt;
			mVelY += -sy * dt;

			mPosX += mVelX * dt;
			mPosY += mVelY * dt;
		}

		public void resolveCollisionWithBounds(float mHorizontalBound, float mVerticalBound) {
			if (mPosX > mHorizontalBound) {
				mPosX = mHorizontalBound;
				mVelX = -mVelX * COR;
			} else if (mPosX < -mHorizontalBound) {
				mPosX = -mHorizontalBound;
				mVelX = -mVelX * COR;
			}
			if (mPosY > mVerticalBound) {
				mPosY = mVerticalBound;
				mVelY = -mVelY * COR;
			} else if (mPosY < -mVerticalBound) {
				mPosY = -mVerticalBound;
				mVelY = -mVelY * COR;
			}
		}
	}
As you can see we have kept the physics of the simulation simple. We use the acceleration values to calculate displacement of the particle along the X and Y axis. Additionally, we add logic to create a bounce effect when it collides with the boundary.
Finally, implement onDraw() method of the custom view to draw a golf ball and grass on the screen. Add the following code to SimulationView class.
    private Particle mBall = new Particle();

	@Override
	protected void onDraw(Canvas canvas) {
		super.onDraw(canvas);

		canvas.drawBitmap(mGrass, 0, 0, null);
		canvas.drawBitmap(mHole, mXOrigin - HOLE_SIZE/2, mYOrigin - HOLE_SIZE/2, null);

        mBall.updatePosition(mSensorX, mSensorY, mSensorZ, mSensorTimeStamp);
        mBall.resolveCollisionWithBounds(mHorizontalBound, mVerticalBound);

        canvas.drawBitmap(mBitmap,
							(mXOrigin - BALL_SIZE/2) + mBall.mPosX,
							(mYOrigin - BALL_SIZE/2) - mBall.mPosY, null);

        invalidate();
	}
And invoke invalidate() so that the view is redrawn repeatedly.
8. What's next?
We share the Eclipse project which should get you started quickly. You can extend this example to come up with something more cool!This example is a simplified version of the AccelerometerPlay sample which is provided with the Android SDK. You may want to take a look at it to see how a multi particle system can be simulated using accelerometer data.