


 Now you can get the latest Java source bundled with each app update. Install the app from Google Play and go to Settings > Extras.
Build your first pro Android application with Eclipse
 Download
Keywords: AppCompat Fragment ActionBar ViewPager Navigation Drawer LoaderManager SQLiteDatabase CursorLoader SimpleCursorAdapter ContentProvider SQLiteOpenHelper ContentResolver ListFragment ListView GridView DialogFragment Volley Library RequestQueue ImageLoader NetworkImageView
Contents
- Overview
- Create a new Eclipse Android project
- Add Android Support library
- Android manifest
- Application theme
- Application class
- Splash screen
- Login screen
- Help screen
- Settings screen
- Navigation Drawer
- Main screen
- Dialog Fragment
- Content Provider
- Data model
- List Fragment
- Data Adapter
- Grid View
- View Pager
- Detail screen
- Volley Library
- What's next?
16. List Fragment
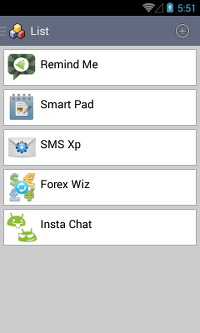 ListFragment is an extension of Fragment class provided by Android that simplifies creating a list view screen.
Create a new ItemListFragment class as follows.
	public class ItemListFragment extends ListFragment implements LoaderManager.LoaderCallbacks<Cursor> {

		private OnFragmentInteractionListener mListener;
		private DataAdapter adapter;

		/**
		 * Mandatory empty constructor for the fragment manager to instantiate the
		 * fragment (e.g. upon screen orientation changes).
		 */
		public ItemListFragment() {
		}

		@Override
		public void onCreate(Bundle savedInstanceState) {
			super.onCreate(savedInstanceState);

			adapter = new DataAdapter(getActivity(), R.layout.fragment_item_list);
			setListAdapter(adapter);

			getLoaderManager().initLoader(0, null, this);
		}

		@Override
		public View onCreateView(LayoutInflater inflater, ViewGroup container, Bundle savedInstanceState) {
			return inflater.inflate(R.layout.fragment_list, container, false);
		}

		@Override
		public void onAttach(Activity activity) {
			super.onAttach(activity);
			try {
				mListener = (OnFragmentInteractionListener) activity;
			} catch (ClassCastException e) {
				throw new ClassCastException(activity.toString()
						+ " must implement OnFragmentInteractionListener");
			}
		}

		@Override
		public void onDetach() {
			super.onDetach();
			mListener = null;
		}

		@Override
		public void onListItemClick(ListView l, View v, int position, long id) {
			super.onListItemClick(l, v, position, id);

			if (null != mListener) {
				// Notify the active callbacks interface (the activity, if the
				// fragment is attached to one) that an item has been selected.
				mListener.onItemSelected(id);
			}
		}

		@Override
		public Loader<Cursor> onCreateLoader(int id, Bundle args) {
			CursorLoader loader = new CursorLoader(getActivity(),
					DataProvider.CONTENT_URI_DATA,
					new String[]{DataProvider.COL_ID, DataProvider.COL_CONTENT},
					null,
					null,
					null);
			return loader;
		}

		@Override
		public void onLoadFinished(Loader<Cursor> loader, Cursor data) {
			adapter.swapCursor(data);
		}

		@Override
		public void onLoaderReset(Loader<Cursor> loader) {
			adapter.swapCursor(null);
		}
	}
There are a few things in the code that we'll discuss next.
First, the class implements LoaderManager.LoaderCallbacks interface which is a best practice for loading data asynchronously. It requires implementation of three methods i.e. onCreateLoader(), onLoadFinished(), onLoaderReset(). The loader is actually initialized in onCreate() method of fragment.
getLoaderManager().initLoader(0, null, this);Second, we create OnFragmentInteractionListener interface which the activity should implement to get notified of a list item click. This is the recommended way of communicating interaction in a fragment to the activity and potentially other fragments contained in that activity.
	public interface OnFragmentInteractionListener {
		/**
		 * Callback for when an item has been selected.
		 */
		public void onItemSelected(long id);
	}
Third, since the fragment class extends ListFragment so we just override onListItemClick() and invoke listener's onItemSelected() to notify the activity.
ListFragment provides a content view by default but we've overridden onCreateView() method to specify a custom fragment_list.xml layout.
	<ListView xmlns:android="http://schemas.android.com/apk/res/android"
		android:id="@android:id/list"
		android:layout_width="match_parent"
		android:layout_height="match_parent"
		android:padding="5dp"
		android:cacheColorHint="@android:color/transparent"
		android:divider="@android:color/transparent"
		android:dividerHeight="5dp" >

	</ListView>
The other layout we have to create is for the list item.
	<LinearLayout xmlns:android="http://schemas.android.com/apk/res/android"
		android:layout_width="match_parent"
		android:layout_height="wrap_content"
		android:padding="5dp"
		android:background="@drawable/background_item">

		<com.android.volley.toolbox.NetworkImageView
			android:id="@+id/imageView1"
			android:layout_width="48dp"
			android:layout_height="48dp" />

		<TextView
			android:id="@android:id/text1"
			android:layout_width="match_parent"
			android:layout_height="wrap_content"
			android:textAppearance="?android:attr/textAppearanceMedium"
			android:gravity="center_vertical"
			android:padding="6dip"
			android:singleLine="true"
		/>

	</LinearLayout>
The background is a shape drawable created in XML that gives the card layout look as seen in the screenshot. Create background_item.xml in res/drawable directory.
	<?xml version="1.0" encoding="utf-8"?>
	<shape xmlns:android="http://schemas.android.com/apk/res/android" android:shape="rectangle">
		<stroke android:width="1dp" android:color="#aaaaaa"/>
		<solid android:color="@android:color/white"/>
	</shape>
Otherwise, the layout is pretty simple except for NetworkImageView that we'll discuss in a later section on Volley library.
17. Data Adapter
An adapter allows us to populate views with data. Android provides SimpleCursorAdapter that makes it easy to bind data to a view when the data source is a database.Create a DataAdapter class that inherits from SimpleCursorAdapter.
	public class DataAdapter extends SimpleCursorAdapter {

		public DataAdapter(Context context, int layout) {
			super(context, layout, null, new String[]{DataProvider.COL_CONTENT}, new int[]{android.R.id.text1}, 0);
		}

		@Override
		public void bindView(View view, Context context, Cursor cursor) {
			String content = cursor.getString(cursor.getColumnIndex(DataProvider.COL_CONTENT));
			Data data = new Data(content);

			String title = data.getTitle();
			String iconUrl = data.getIcon();

			TextView titleText = (TextView) view.findViewById(android.R.id.text1);
			titleText.setText(title);

			NetworkImageView iconView = (NetworkImageView) view.findViewById(R.id.imageView1);
			iconView.setDefaultImageResId(R.drawable.ic_launcher);
			iconView.setImageUrl(iconUrl, App.getInstance().getImageLoader());
		}

	}
We just need to override the bindView() method to set values to views from the cursor. We'll reuse the same DataAdapter class for GridView and ViewPager later.
There is one pending task that is required to make the flow work. If you recall, the navigation drawer items currently point to an empty content fragment. It's time to update selectItem() method in DrawerActivity class.
    private void selectItem(int position) {
        // update the main content by replacing fragments
        Fragment fragment = null;

        switch(position) {
        case 0:
        	fragment = new ItemListFragment();
        	break;

        case 1:
        	fragment = new ItemGridFragment();
        	break;

        case 2:
        	fragment = new ItemPagerFragment();
        	break;

        default:
        	fragment = new ContentFragment();
            Bundle args = new Bundle();
            args.putInt(ContentFragment.ARG_POSITION, position);
            fragment.setArguments(args);
        }

        FragmentManager fragmentManager = getSupportFragmentManager();
        fragmentManager.beginTransaction().replace(R.id.content_frame, fragment).commit();

        // update selected item and title, then close the drawer
        mDrawerList.setItemChecked(position, true);
        setTitle(mNavigationTitles[position]);
        mDrawerLayout.closeDrawer(mDrawerList);
    }
We went ahead and added ItemGridFragment and ItemPagerFragment as well but these fragments will be implemented in subsequent sections.