


 Now you can get the latest Java source bundled with each app update. Install the app from Google Play and go to Settings > Extras.
Build your first pro Android application with Eclipse
 Download
Keywords: AppCompat Fragment ActionBar ViewPager Navigation Drawer LoaderManager SQLiteDatabase CursorLoader SimpleCursorAdapter ContentProvider SQLiteOpenHelper ContentResolver ListFragment ListView GridView DialogFragment Volley Library RequestQueue ImageLoader NetworkImageView
Contents
- Overview
- Create a new Eclipse Android project
- Add Android Support library
- Android manifest
- Application theme
- Application class
- Splash screen
- Login screen
- Help screen
- Settings screen
- Navigation Drawer
- Main screen
- Dialog Fragment
- Content Provider
- Data model
- List Fragment
- Data Adapter
- Grid View
- View Pager
- Detail screen
- Volley Library
- What's next?
7. Splash screen
 It is not recommended to put a splash screen in an app unless absolutely necessary such as in a game for pre-loading resources. However, we include one just for demonstration and to learn some UI effects as well.
First, we'll create an activity for the screen. In Eclipse, go to File > New > Other... to open New wizard. Select Android Activity under Android and click Next. Select Blank Activity and click Next. Enter SplashActivity as Activity Name and check option Launcher Activity. Click Finish.
A Java class along with layout file is generated for you by ADT. The manifest also gets updated with the new component. Here is an excerpt from AndroidManifest.xml file.
	<manifest>
		<application>
			<activity
				android:name="com.appsrox.showcase.SplashActivity"
				android:theme="@style/AppTheme.NoTitle" >
				<intent-filter>
					<action android:name="android.intent.action.MAIN" />

					<category android:name="android.intent.category.LAUNCHER" />
				</intent-filter>
			</activity>
We specified a custom theme AppTheme.NoTitle for SplashActivity since splash screen doesn't need a title. Add the below snippet in styles.xml present under res/values directory.
    <style name="AppTheme.NoTitle">
        <item name="android:windowNoTitle">true</item>

        <!-- Support library compatibility -->
        <item name="windowActionBar">false</item>
    </style>
Let's now modify the layout file activity_splash.xml under res/layout directory as follows.
	<RelativeLayout xmlns:android="http://schemas.android.com/apk/res/android"
		xmlns:tools="http://schemas.android.com/tools"
		android:layout_width="match_parent"
		android:layout_height="match_parent"
		android:paddingBottom="@dimen/activity_vertical_margin"
		android:paddingLeft="@dimen/activity_horizontal_margin"
		android:paddingRight="@dimen/activity_horizontal_margin"
		android:paddingTop="@dimen/activity_vertical_margin"
		tools:context=".SplashActivity" >

		<TextView
			android:id="@android:id/text1"
			android:layout_width="wrap_content"
			android:layout_height="wrap_content"
			android:layout_centerInParent="true"
			android:textSize="42sp"
			android:textColor="@android:color/white"
			android:shadowColor="#333333"
			android:shadowDx="-1"
			android:shadowDy="-1"
			android:shadowRadius="2"
			android:text="@string/app_name" />

	</RelativeLayout>
Notice the android:shadow... attributes on TextView to create a shadow effect as seen in the screenshot. The font of the text and background of the screen is specified in code.
Next, we'll take a look at the activity class. We make SplashActivity class inherit from android.support.v4.app.FragmentActivity to support older platforms since Fragments were introduced by Android in API Level 11.
	public class SplashActivity extends FragmentActivity {

		private Typeface font;
		private TextView text1;

		@Override
		protected void onCreate(Bundle savedInstanceState) {
			super.onCreate(savedInstanceState);
			getWindow().setBackgroundDrawableResource(R.drawable.background_splash);

			setContentView(R.layout.activity_splash);

			text1 = (TextView) findViewById(android.R.id.text1);

			font = Typeface.createFromAsset(getAssets(), "fonts/Font.ttf");
			text1.setTypeface(font);
		}
	}
Custom fonts for a TextView is specified as shown in the snippet above. Create a fonts folder under assets directory of the project. Put .ttf file of the font you want to use.
Next, we'll put the secret sauce that transitions the app to the next screen. We take help of android.os.Handler to post a Runnable after some delay and launch the Login screen. However, in real world scenario you would trigger the transition post loading of resources etc.
Here is the modified code in SplashActivity class.
	private Handler handler;
	private Runnable callback;

	@Override
	protected void onCreate(Bundle savedInstanceState) {

		/* previous code */

		//launch the next screen after delay
        handler = new Handler();
        callback = new Runnable() {
			@Override
			public void run() {
				startActivity(new Intent(getApplicationContext(), LoginActivity.class));
				finish();
				overridePendingTransition(android.R.anim.fade_in, android.R.anim.fade_out);
			}
		};
        handler.postDelayed(callback, 10000);
	}

	@Override
	protected void onPause() {
		super.onPause();
		handler.removeCallbacks(callback);
	}
overridePendingTransition() method of FragmentActivity allows us to add animation to the page transition. We make use of default animations provided by Android i.e. android.R.anim.fade_in, android.R.anim.fade_out, etc. However, you can create your own animations as well.
8. Login screen
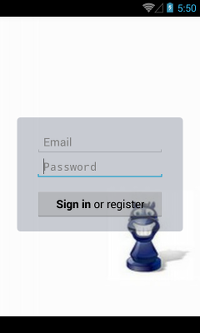 The ADT plugin simplifies creating login screen by generating code through pre-defined templates. Go to New > Other... and select Android Object under Android folder. Click Next. Select Login Activity and click Next. Enter LoginActivity as Activity Name and click Finish.
The plugin generates activity class, layout file, string resources, and modifies the manifest as well.
We've modified the generated login screen a bit as seen in the screenshot above. To give a rounded translucent background to the login box edit values/styles.xml as follows.
    <style name="LoginFormContainer">
        <item name="android:layout_width">wrap_content</item>
        <item name="android:layout_height">wrap_content</item>
        <item name="android:background">@drawable/rounded</item>
    </style>
@drawable/rounded is a shape drawable defined through XML. Android makes it easy to create custom drawables for simple shapes in XML as well as programmatically. Create rounded.xml under res/drawable directory with the following content.
	<?xml version="1.0" encoding="utf-8"?>
	<shape xmlns:android="http://schemas.android.com/apk/res/android" >
		<corners android:radius="5dp"/>
		<padding android:left="30dp" android:top="20dp" android:right="30dp" android:bottom="20dp"/>
		<solid android:color="@color/opaque_background"/>
	</shape>
@color/opaque_background is specified in colors.xml under res/values directory. Here is the content of the file.
	<?xml version="1.0" encoding="utf-8"?>
	<resources>
		<item name="opaque" type="color">#cc000000</item>
		<item name="background" type="color">#616A7F</item>
		<item name="opaque_background" type="color">#55616A7F</item>
		<item name="background_light" type="color">#cccccc</item>
		<item name="background_dark" type="color">#222222</item>
	</resources>
In LoginActivity class we modified onCreate() method to add a background image to the login screen like we did for splash screen.
	@Override
	protected void onCreate(Bundle savedInstanceState) {
		super.onCreate(savedInstanceState);
		getWindow().setBackgroundDrawableResource(R.drawable.background_login);

		setContentView(R.layout.activity_login);

		/* remaining code */
Next, modify onPostExecute() method in UserLoginTask inside LoginActivity.java as follows.
	@Override
	protected void onPostExecute(final Boolean success) {
		mAuthTask = null;
		showProgress(false);

		if (success) {
			startActivity(new Intent(getApplicationContext(), MainActivity.class));
			finish();
			overridePendingTransition(android.R.anim.slide_in_left, android.R.anim.slide_out_right);
		} else {
			mPasswordView.setError(getString(R.string.error_incorrect_password));
			mPasswordView.requestFocus();
		}
	}
This launches the Main screen if user authentication is successful. However, the default generated code in doInBackground() method of UserLoginTask simulates network call through Thread.sleep() which you need to replace with your own logic to authenticate the user.
Here is a code snippet that can be used for making HTTP request to a server-side application.
	public void postData() {
		// Create a new HttpClient and Post Header
		HttpClient httpclient = new DefaultHttpClient();
		HttpPost httppost = new HttpPost("http://www.yoursite.com/script.php");

		try {
			// Add your data
			List<NameValuePair> nameValuePairs = new ArrayList<NameValuePair>(2);
			nameValuePairs.add(new BasicNameValuePair("id", "email@example.com"));
			nameValuePairs.add(new BasicNameValuePair("password", "*****"));
			httppost.setEntity(new UrlEncodedFormEntity(nameValuePairs));

			// Execute HTTP Post Request
			HttpResponse response = httpclient.execute(httppost);
			//TODO check response

		} catch (ClientProtocolException e) {
			// TODO Auto-generated catch block
		} catch (IOException e) {
			// TODO Auto-generated catch block
		}
	}
According to Android Developers Blog, HttpURLConnection is a better choice than HttpClient for Gingerbread and newer versions of Android.
Here is code snippet to check network connectivity.
	ConnectivityManager connMgr = (ConnectivityManager) context.getSystemService(Context.CONNECTIVITY_SERVICE);
	NetworkInfo netInfo = connMgr.getActiveNetworkInfo();
	boolean isConnected = netInfo != null && netInfo.getState() == NetworkInfo.State.CONNECTED;

	if (isConnected) {
		postData();
	}
Finally, create MainActivity using Eclipse wizard to complete the flow. However, we will implement the main screen later and take up Help screen next.