


 Now you can get the latest Java source bundled with each app update. Install the app from Google Play and go to Settings > Extras.
Create a Notepad and To-do list combined app in Android
 Download
Keywords: TabHost ListView ExpandableListActivity SQLite SimpleCursorAdapter SimpleCursorTreeAdapter PreferenceActivity AlertDialog ContextMenu Spinner Gallery ScrollView Camera
Contents
- Overview
- Create a new Eclipse Android project
- Define the Data model
- The Android Manifest file
- The Application class
- Develop the UI
- The Browse tab
- The Manage tab
- The Preferences screen
- The Alert Dialog
- The Context Menu
- The Edit Page
- Image Capture
8. The Manage tab
The Manage tab is similar to the Browse tab except it uses an ExpandableListView and SimpleCursorTreeAdapter. Each group item represents a category where as child items within it are the notes.The implementaion of an expandable list is very easy since Android provides ExpandableListActivity which already implements the functionality to expand/collapse a group item.
Android provides ListActivity for implementing a list. However, we didn't use it while developing the Browse tab since there is a known issue in the SDK. In brief, the id of the views i.e. @android:id/list conflict when used together with ExpandableListActivity in a TabHost.
Here is an outline of the ManageActivity class.
	public class ManageActivity extends ExpandableListActivity {

		@Override
		public void onCreate(Bundle savedInstanceState) {
			super.onCreate(savedInstanceState);
			setContentView(R.layout.tab_manage);
		}

		@Override
		protected void onResume() {
			super.onResume();

			Cursor c = Category.list(SmartPad.db);
			startManagingCursor(c);
			SimpleCursorTreeAdapter adapter = new CategoryTreeAdapter(this, c);
			setListAdapter(adapter);
		}

		//--------------------------------------------------------------------------

		private class CategoryTreeAdapter extends SimpleCursorTreeAdapter {

			public CategoryTreeAdapter(Context context, Cursor cursor) {
				super(
						context,
						cursor,
						R.layout.row_category,
						new String[]{Category.COL_NAME},
						new int[]{android.R.id.text1},
						R.layout.row_category_note,
						new String[]{Note.COL_TITLE},
						new int[]{android.R.id.text1});
			}

			@Override
			protected Cursor getChildrenCursor(Cursor groupCursor) {
				int columnIndex = groupCursor.getColumnIndex(Category.COL_ID);
				String categoryId = groupCursor.getString(columnIndex);
				Cursor c = Note.list(SmartPad.db, categoryId);
				startManagingCursor(c);
				return c;
			}

			@Override
			protected void bindGroupView(View view, Context context, Cursor cursor, boolean isExpanded) {
				super.bindGroupView(view, context, cursor, isExpanded);

				((TextView)view.findViewById(android.R.id.text1))
					.setCompoundDrawablesWithIntrinsicBounds(R.drawable.folder, 0, 0, 0);
			}

			@Override
			protected void bindChildView(View view, Context context, Cursor cursor, boolean isLastChild) {
				super.bindChildView(view, context, cursor, isLastChild);

				((TextView)view.findViewById(android.R.id.text1))
					.setCompoundDrawablesWithIntrinsicBounds(R.drawable.file, 0, 0, 0);
			}

		}
	}
SimpleCursorTreeAdapter is an abstract class and we need to provide implementation for getChildrenCursor() method. Additionally, we have overridden bindGroupView() and bindChildView() to set icon next to the title.
The content view for this tab is almost similar to the Browse tab. Here is the portion which is different.
    <ExpandableListView
        android:id="@android:id/list"
        android:layout_width="fill_parent"
        android:layout_height="0dip"
        android:layout_weight="1"
        android:cacheColorHint="#00000000"
        android:divider="@android:color/transparent"
        android:drawSelectorOnTop="false"
        android:groupIndicator="@null" />
Notice that you can specify your own groupIndicator in the ExpandableListView otherwise the default indicator is shown. However, we chose to remove it by setting it as @null.
9. The Preferences screen
The tools button at the bottom of the Manage tab navigates user to the Settings screen.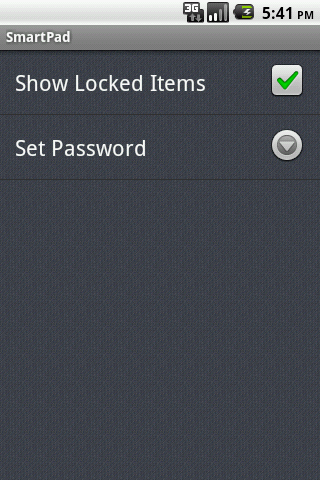
Create a new Activity and make it extend PreferenceActivity. Here is the code.
	public class SettingsActivity extends PreferenceActivity {

		private static final String TAG = "SettingsActivity";

		@Override
		public void onCreate(Bundle savedInstanceState) {
			super.onCreate(savedInstanceState);
			addPreferencesFromResource(R.xml.settings);
		}
	}
The settings.xml file was created earlier while developing the Application class.
Declare the SettingsActivity in AndroidManifest.xml
<activity android:name=".SettingsActivity"></activity>Edit the tab_manage.xml to specify onClick function for the settings button.
	<ImageButton
		android:id="@+id/settings_btn"
		android:layout_width="wrap_content"
		android:layout_height="wrap_content"
		android:onClick="onClick"
		android:layout_margin="5dip"
		android:background="@drawable/btn_bg"
		android:src="@drawable/preferences" />
Add onClick() method to ManageActivity.
	public void onClick(View v) {
		switch (v.getId()) {
		case R.id.new_btn:
			// TODO show dialog for new category
			break;

		case R.id.settings_btn:
			Intent intent = new Intent();
			intent.setClass(this, SettingsActivity.class);
			startActivity(intent);
			break;
		}
	}
In the next chapter we discuss how the flow of the application is implemented and the various menus and dialogs.