


 Now you can get the latest Java source bundled with each app update. Install the app from Google Play and go to Settings > Extras.
Create a Notepad and To-do list combined app in Android
 Download
Keywords: TabHost ListView ExpandableListActivity SQLite SimpleCursorAdapter SimpleCursorTreeAdapter PreferenceActivity AlertDialog ContextMenu Spinner Gallery ScrollView Camera
Contents
- Overview
- Create a new Eclipse Android project
- Define the Data model
- The Android Manifest file
- The Application class
- Develop the UI
- The Browse tab
- The Manage tab
- The Preferences screen
- The Alert Dialog
- The Context Menu
- The Edit Page
- Image Capture
12. The Edit Page
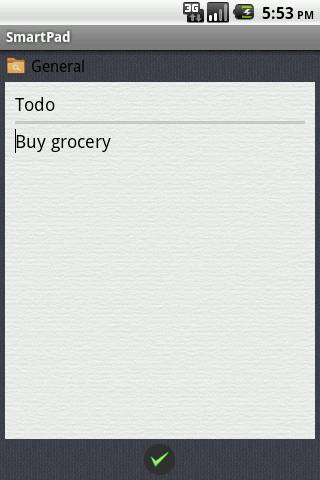
The app allows user to create a note, a checklist, and a snapshot. We will create a single layout file to handle the 3 cases since they are almost similar. However, we will create separate Activity for each case to keep our code manageable.
    <RelativeLayout
        android:layout_width="fill_parent"
        android:layout_height="wrap_content" >
	    <ImageButton
	        android:id="@+id/category_btn"
		    android:layout_width="wrap_content"
		    android:layout_height="wrap_content"
		    android:layout_alignParentLeft="true"
		    android:layout_centerVertical="true"
		    android:background="@null"
		    android:src="@drawable/folder" />

		<Spinner
		    android:id="@+id/spinner"
		    android:layout_width="wrap_content"
		    android:layout_height="wrap_content"
		    android:layout_toRightOf="@id/category_btn"
		    android:layout_centerVertical="true"
		    android:background="@null" />
    </RelativeLayout>
The center region is a ScrollView containing all the widgets required to handle the 3 cases. We hide the widgets which are not applicable for a particular case. We will discuss more about it as we take up each case.The bottom region is a simple ImageButton.
We create a BaseActivity which contains all the common functionality but we won't declare it in the AndroidManifest.xml file.
	class BaseActivity extends Activity {
		protected Spinner spinner;

		@Override
		public void onCreate(Bundle savedInstanceState) {
			super.onCreate(savedInstanceState);
			setContentView(R.layout.note);

			spinner = (Spinner) findViewById(R.id.spinner);

			Cursor c = Category.list(SmartPad.db);
			startManagingCursor(c);
			SimpleCursorAdapter adapter = new SimpleCursorAdapter(
					this,
					android.R.layout.simple_spinner_item,
					c,
					new String[]{Category.COL_NAME},
					new int[]{android.R.id.text1});
			adapter.setDropDownViewResource(android.R.layout.simple_spinner_dropdown_item);
			spinner.setAdapter(adapter);

			spinner.setOnItemSelectedListener(new AdapterView.OnItemSelectedListener() {
				public void onItemSelected(AdapterView<?> parent, View view, int position, long id) {
					// TODO set category id to the note
				}

				public void onNothingSelected(AdapterView<?> parent) {
				}
			});
		}
	}
As you can see, we use the Spinner to allow user to choose a category for the note.Additionally, BaseActivity also handles the title EditText field which is common to the 3 screens.
We create three Activities each extends BaseActivity and declare them in the AndroidManifest.xml file.
	<activity android:name=".note.BasicActivity"></activity>
	<activity android:name=".note.ChecklistActivity"></activity>
	<activity android:name=".note.SnapshotActivity"></activity>
BasicActivity gets much of its functionality from BaseActivity and only adds content EditText field inside the ScrollView.
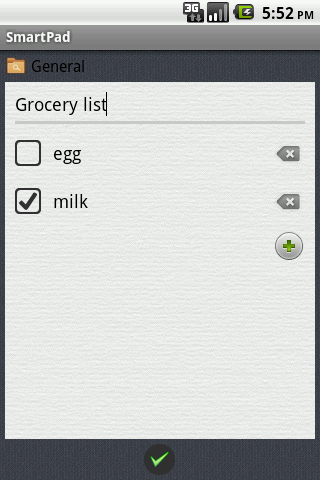
For the check items we create an empty LinearLayout in which we add CheckBox programatically. Here is how it is done in ChecklistActivity.
getLayoutInflater().addView(inflater.inflate(R.layout.row_checkitem, null));Where row_checkitem.xml is the layout file for rendering each row.
	<?xml version="1.0" encoding="utf-8"?>
	<LinearLayout xmlns:android="http://schemas.android.com/apk/res/android"
		android:layout_width="fill_parent"
		android:layout_height="wrap_content" >
		<CheckBox
			android:id="@+id/item_cb"
			android:layout_width="wrap_content"
			android:layout_height="wrap_content"
			android:layout_gravity="center_vertical"
			android:button="@drawable/cb_selector" />
		<EditText
			android:id="@+id/item_et"
			android:layout_width="0dip"
			android:layout_height="wrap_content"
			android:layout_gravity="center_vertical"
			android:layout_weight="1"
			android:ems="10"
			android:background="@null"
			android:hint="_________________________" >
		</EditText>
		<ImageButton
			android:id="@+id/deleteitem_btn"
			style="?android:attr/buttonStyleSmall"
			android:layout_width="wrap_content"
			android:layout_height="wrap_content"
			android:layout_gravity="center_vertical"
			android:background="@null"
			android:src="@android:drawable/ic_input_delete" />
	</LinearLayout>
Notice that we have set the button attribute of CheckBox to a selector drawable.
	<?xml version="1.0" encoding="utf-8"?>
	<selector xmlns:android="http://schemas.android.com/apk/res/android" >
		<item android:state_checked="true" android:drawable="@drawable/checked" />
		<item android:state_checked="false" android:drawable="@drawable/unchecked" />
	</selector>
Based on the state it displays a checked or unchecked image.
Also EditText has an useful attribute hint which we use to display an underline when nothing is entered in the field.
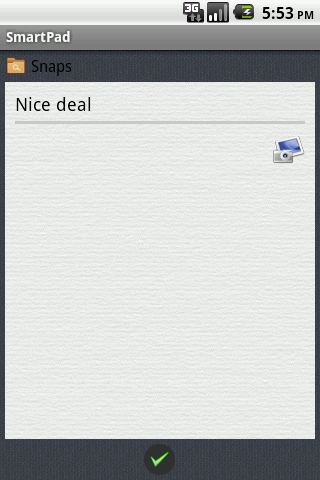
Finally, for snapshot we add a Gallery in the ScrollView to display multiple images in a row.
	<Gallery
		android:id="@+id/gallery"
		android:layout_width="fill_parent"
		android:layout_height="wrap_content"
		android:spacing="10dip" />
The relevant code from SnapshotActivity class is given below.
		Cursor c = Attachment.list(SmartPad.db, String.valueOf(note.getId()));
		startManagingCursor(c);
		SimpleCursorAdapter adapter = new SimpleCursorAdapter(
				this,
				R.layout.gallery_item,
				c,
				new String[]{Attachment.COL_URI},
				new int[]{R.id.image});
		gallery.setAdapter(adapter);
Where gallery_item.xml is a simple layout file with an ImageView.
	<ImageView xmlns:android="http://schemas.android.com/apk/res/android"
		android:id="@+id/image"
		android:layout_width="wrap_content"
		android:layout_height="wrap_content"
		android:scaleType="centerInside"
		android:background="@drawable/photo_bg" />
We want to show a full screen image when user clicks on a gallery item. Make SnapshotActivity implement AdapterView.OnItemClickListener. Add the following line in onCreate() method.
gallery.setOnItemClickListener(this);And add onItemClick() method in the class.
	@Override
	public void onItemClick(AdapterView<?> parent, View view, int position, long id) {
		Intent intent = new Intent();
		intent.setClass(this, PhotoActivity.class);
		intent.putExtra(Attachment.COL_ID, id);
		startActivity(intent);
	}
Where PhotoActivity simply fetches the Uri of the image from DB using the attachment id and displays it on the screen.
13. Image Capture
We offload the functionality of image capture on to another Activity by creating a proper Intent and starting the Activity for result. Add this piece of code in the onClick() function of the ImageButton.
	try {
		Intent intent = new Intent(MediaStore.ACTION_IMAGE_CAPTURE);
		openFileOutput(TEMP_IMAGE, MODE_WORLD_WRITEABLE).close();
		tempImageUri = Uri.fromFile(getFileStreamPath(TEMP_IMAGE));
		intent.putExtra(MediaStore.EXTRA_OUTPUT, tempImageUri);
		startActivityForResult(intent, TAKE_SNAPSHOT);

	} catch (ActivityNotFoundException e) {
		Toast.makeText(getApplicationContext(), "No camera app found!", Toast.LENGTH_LONG).show();
	} catch (IOException e) {
		Toast.makeText(getApplicationContext(), "Unable to write file on internal storage", Toast.LENGTH_LONG).show();
	}
To capture the result we need to override the onActivityResult() method of the Activity.
    @Override
    public void onActivityResult(int requestCode, int resultCode, Intent data) {
        if (requestCode == TAKE_SNAPSHOT && resultCode == Activity.RESULT_OK) {
			if (Environment.MEDIA_MOUNTED.equals(Environment.getExternalStorageState())) {
				FileOutputStream fos = null;
				try {
					File rootPath = new File(Environment.getExternalStorageDirectory(), "images");
					if (!rootPath.exists())
						rootPath.mkdirs();

					DateFormat df = new SimpleDateFormat("yyyy-MM-dd-kk-mm-ss");
					String snapshotImage = df.format(new Date()) + ".jpg";
					File snapshotFile = new File(rootPath, snapshotImage);
					fos = new FileOutputStream(snapshotFile);

					Bitmap bitmap = getBitmap(Uri.fromFile(getFileStreamPath(TEMP_IMAGE)));
					bitmap.compress(Bitmap.CompressFormat.JPEG, 80, fos);

				} catch (FileNotFoundException e) {
					Toast.makeText(this, "Unable to write file on external storage", Toast.LENGTH_LONG).show();
				} finally {
					if (fos != null) {
						try {
							fos.close();
						} catch (IOException e) {}
					}
				}
				deleteFile(TEMP_IMAGE);
			}
        }
    }
getBitmap() is an utility function we have written which decodes the given image Uri.
	private Bitmap getBitmap(Uri imageUri) {
		try {
		    // Get the dimensions of the bitmap
		    BitmapFactory.Options opts = new BitmapFactory.Options();
		    opts.inJustDecodeBounds = true;
		    BitmapFactory.decodeFile(imageUri.getPath(), opts);
		    int photoW = opts.outWidth;
		    int photoH = opts.outHeight;

		    // Get the dimensions of the screen
		    Display disp = getWindowManager().getDefaultDisplay();
		    int screenW = disp.getWidth();
		    int screenH = disp.getHeight();

		    // Determine how much to scale down the image
		    int scaleFactor = Math.max(photoW, photoH) / Math.min(screenW, screenH);

		    // Decode the image file into a Bitmap sized to fill the View
		    opts.inJustDecodeBounds = false;
		    opts.inSampleSize = scaleFactor * 2;
		    opts.inPurgeable = true;

			return BitmapFactory.decodeFile(imageUri.getPath(), opts);

		} catch (Exception e) {
		}

		return null;
	}
This completes our tutorial but you are encouraged to download and explore the code to get into more details of the implementation.