


 Now you can get the latest Java source bundled with each app update. Install the app from Google Play and go to Settings > Extras.
Create a game like Flappy Bird in Android using AndEngine
 Download
Keywords: AndEngine AndEnginePhysicsBox2DExtension SimpleBaseGameActivity ResourceManager SceneManager MenuScene CameraScene AutoParallaxBackground AnimatedSprite DynamicSpriteBatch TiledSprite Sound Music HUD Font PhysicsHandler GenericPool PhysicsWorld Fixture Body ContactListener
Contents- Overview
- Create a new Eclipse Android project
- Add AndEngine library
- Add AndEngine Physics Box2D extension
- Android manifest
- AndEngine concepts
- Game Activity
- Resource Manager
- TextureAtlas & TextureRegion
- Font
- Sound & Music
- Scene Manager
- Base Scene
- Splash Scene
- Main Menu Scene
- Sub Menu Scene
- Game Scene
- Auto Parallax Background
- HUD
- Bird
- Pipes
- Generic Pool
- Physics World
- Body & Fixture
- Contact Listener
- Camera Scene
- What's next?
- FlappyChick
- assets
- font
- Font2.ttf
- Font1.ttf
- gfx
- game
- play_pos.png
- Flappy_Birdies.png
- ready_over.png
- medal.png
- help.png
- Flappy_Background.png
- board.png
- Flappy_Pipe.png
- Flappy_Ground.png
- splash
- logo.png
- game
- mfx
- metal_hit.ogg
- bird_sound.ogg
- font
- res
- drawable-xhdpi
- ic_launcher.png
- values
- strings.xml
- styles.xml
- drawable-xhdpi
- src
- com
- appsrox
- flappychick
- scene
- BaseScene.java
- SplashScene.java
- GameScene.java
- MainMenuScene.java
- entity
- Pipe.java
- PipePool.java
- GameActivity.java
- SceneManager.java
- ResourceManager.java
- scene
- flappychick
- appsrox
- com
- AndroidManifest.xml
- assets
1. Overview
In this tutorial we show how to recreate Flappy Bird game in Android. We choose AndEngine as the game engine since it's very simple to learn and get started. Additionally, we'll use AndEngine Physics Box2D Extension which adds support for Box2D physics in a game. If you are getting started in game development with AndEngine then this tutorial will introduce you to the basic concepts.
Tip: If you prefer a no-code tool, please check out Flappy Bird clone maker.
AndEngine is a popular game engine by Nicolas Gramlich. It is very well suited for 2D games like Flappy Bird. Along with extensions it provides additional capabilities such as Physics, Multi-player, Scripting, etc.
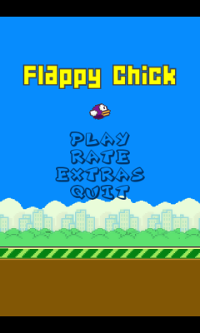
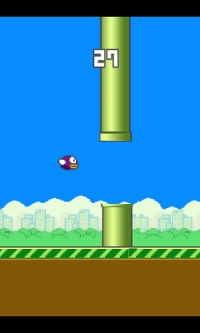
Here are a few screenshots of the game.
2. Create a new Eclipse Android project
In Eclipse, go to File > New > Project and in the New Project dialog, expand Android folder to select Android Project.In New Android Project dialog enter the project details as follows.
Application Name: Flappy Chick
Project Name: FlappyChick
Package Name: com.appsrox.flappychick
Minimum Required SDK: API 8
Compile With: API 19
Theme: None
Click Next and uncheck Create Activity. Click Next and Finish. The project gets created in your workspace.
3. Add AndEngine library
AndEngine library is open source and the source code is available on GitHub. As of writing of this article, there are three branches: master, GLES2, and GLES2-AnchorCenter. Anchor Center is the latest but we'll use GLES2 since it's been around for a while.Anchor Center is the latest and is in active development so it's worth moving on to it. Moreover, its coordinate system (origin in the lower left) is the native OpenGL coordinate system (eases portability).
Let's import the project from Github. In Eclipse, go to File > Import... > Git > Projects from Git. Click Next and select URI. Click Next and in 'Import Projects from Git' dialog, enter the following in URI field:https://github.com/nicolasgramlich/AndEngine.git
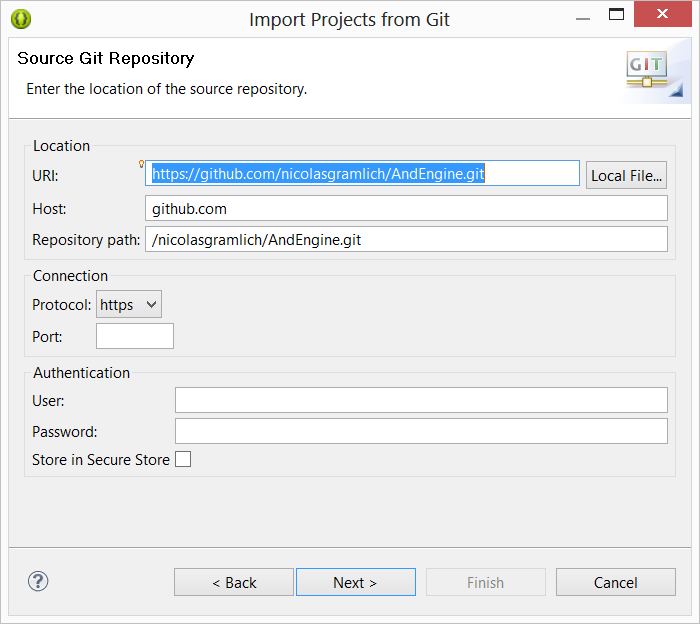 The Host and Repository path should get populated automatically. Click Next.
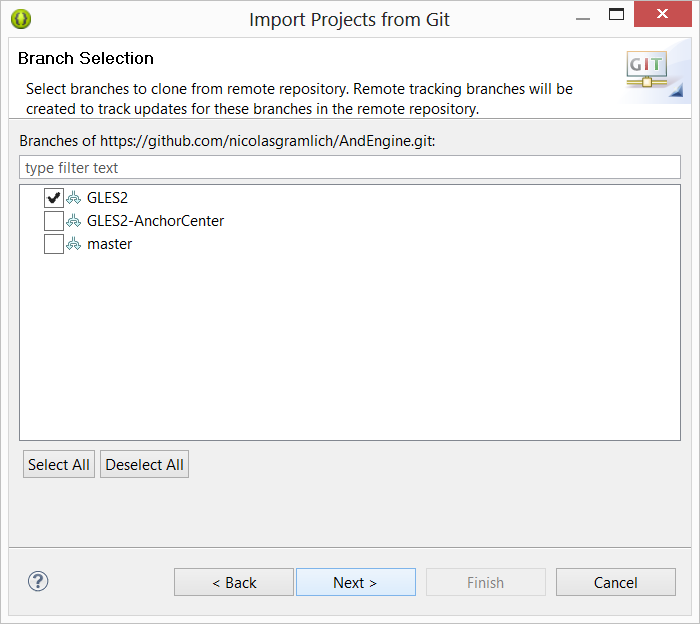 Select GLES2 branch and click Next, Next, and Finish. The library should get imported into the workspace.
Finally, add AndEngine as a library to the FlappyChick project in Eclipse project properties.
4. Add AndEngine Physics Box2D extension
AndEnginePhysicsBox2DExtension is an extension to AndEngine which adds supports for Box2D physics. It makes possible all physics related stuff in a game like density, elasticity, friction, gravity, collision, etc.It is also a library project and needs to be imported into the workspace. Follow the steps as outlined in previous section to import projects from GitHub but use the following URI:
https://github.com/nicolasgramlich/AndEnginePhysicsBox2DExtension.gitThe branch should be GLES2. Once the library is imported into workspace it may give build errors since it is dependent on AndEngine library. Go to its Project properties and ensure that AndEngine is added as library.
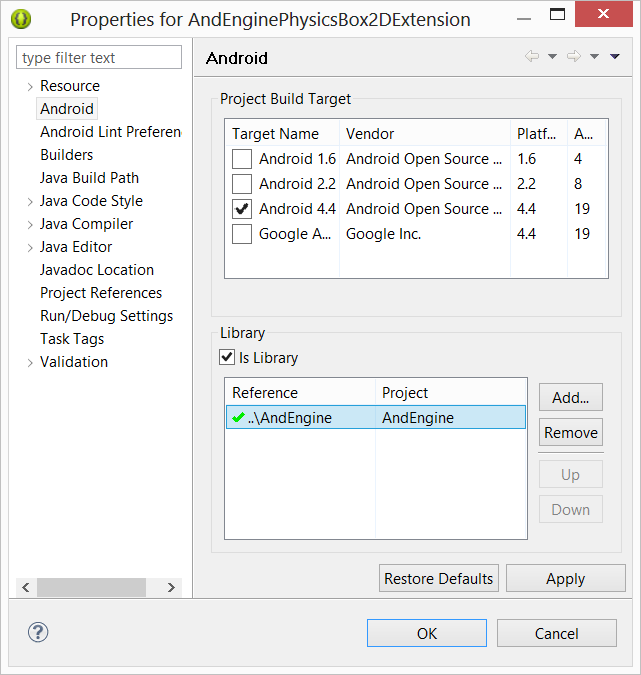 Finally, add AndEnginePhysicsBox2DExtension as a library to the FlappyChick project.
5. Android manifest
The AndroidManifest.xml file describes the Android application. We need to edit this file to declare various components, features, permissions, etc. used by the application.Modify the manifest as follows:
	<manifest xmlns:android="http://schemas.android.com/apk/res/android"
		package="com.appsrox.flappychick"
		android:versionCode="1"
		android:versionName="1.0" >

		<uses-sdk
			android:minSdkVersion="8"
			android:targetSdkVersion="18" />

		<uses-feature android:glEsVersion="0x00020000" android:required="true"/>
		<uses-feature android:name="android.hardware.touchscreen" android:required="false"/>

		<uses-permission android:name="android.permission.WAKE_LOCK"/>
		<uses-permission android:name="android.permission.INTERNET"/>

		<application
			android:allowBackup="true"
			android:icon="@drawable/ic_launcher"
			android:label="@string/app_name"
			android:theme="@style/AppTheme" >
			<activity
				android:name="com.appsrox.flappychick.GameActivity"
				android:label="@string/app_name"
				android:configChanges="orientation" >
				<intent-filter>
					<action android:name="android.intent.action.MAIN" />
					<category android:name="android.intent.category.LAUNCHER" />
				</intent-filter>
			</activity>
		</application>

	</manifest>
If you choose to test the game on a virtual device (third-party emulator) then you may need to set few attributes on application element to avoid random issues.
<application android:vmSafeMode="true" android:hardwareAccelerated="true"