


 Now you can get the latest Java source bundled with each app update. Install the app from Google Play and go to Settings > Extras.
Set up the development environment and create your first HelloWorld Android application
Keywords: Eclipse IDE Android SDK ADT Plugin AVD Emulator Hello World
Contents- Download and Install Java JDK
- Download and Install Eclipse IDE
- Download and Install Android SDK
- Setup Google Play Services SDK
- Install the Android Development Tools (ADT) Plugin
- Install a Platform
- Create new Android Virtual Device (AVD)
- Android Emulator
- Create a New Android Project
- Run the Application
- Troubleshooting
- What's next?
- HelloWorld
- res
- layout
- main.xml
- drawable-hdpi
- ic_launcher.png
- drawable-xhdpi
- ic_launcher.png
- drawable-mdpi
- ic_launcher.png
- values
- strings.xml
- drawable-ldpi
- ic_launcher.png
- layout
- src
- com
- appsrox
- helloworld
- MainActivity.java
- helloworld
- appsrox
- com
- AndroidManifest.xml
- res
1. Download and Install Java JDK
If you already have Java JDK (version 6 or later) installed on your machine then you can skip this section. Otherwise you need to download it from the Java SE Downloads site.Make sure you download the JDK and not JRE.
Run the setup program, click next, next, finish. Once installation finishes, set the JAVA_HOME environment variable and add %JAVA_HOME%\bin to the Path.2. Download and Install Eclipse IDE
If you already have Eclipse IDE on your machine, there is no harm in having a separate Eclipse installation dedicated to Android application development.Download Eclipse IDE for Java Developers 3.7 (Indigo) from the Eclipse Downloads site. Installation is pretty simple as all you need to do is unpack the zip file to a directory of your choice.
3. Download and Install Android SDK
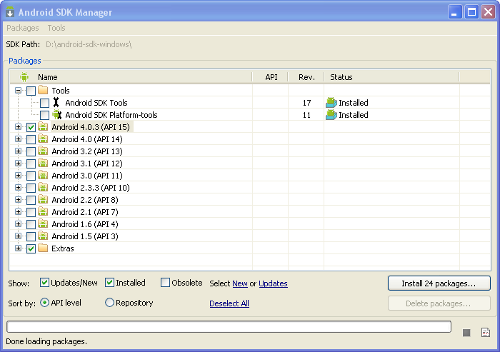
The Android SDK is the main component in the whole stack which provides various tools for creating, packaging, running, debugging, and monitoring your Android application.Download Android SDK from the Android Developers site. It too comes as a zip file which you need to unpack to a directory of your choice. Run SDK Manager.exe

Notice that the default installation does not come with the platform tools installed. Additionally, we need atleast one platform to develop and run our Android application. We'll install the platform through the Eclipse ADT plugin later.
Select Android SDK Platform-tools and click Install package. Finish the installation steps and close the SDK Manager.
If you encounter any problem while downloading the packages, you may have to do this additional step. Go to Tools > Options in the SDK Manager window and enable 'Force https ... to be fetched using http ...'
Set the ANDROID_HOME environment variable pointed to the SDK installation directory. Add %ANDROID_HOME%\tools and %ANDROID_HOME%\platform-tools to the path.4. Setup Google Play Services SDK
The Google Play services SDK is an extension to the Android SDK that allows you to use Google powered features such as Maps, Google+, etc. in your app.The installation of Google Play Services SDK is also done through the SDK Manager.
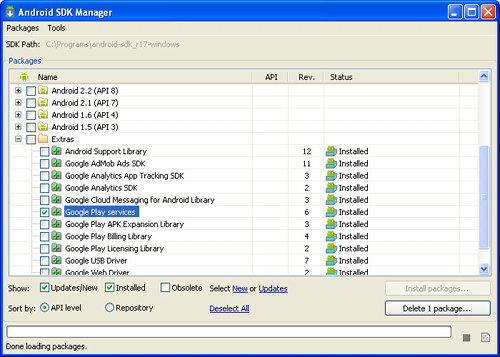
In the package list, expand Extras and select Google Play services. Click Install. That's it!
5. Install the Android Development Tools (ADT) Plugin
The ADT plugin facilitates interaction with the Android SDK and provides many useful features including Android project creation in Eclipse as well as packaging, running, debugging, and monitoring your application all from the IDE itself.Launch Eclipse and create a new workspace for your Android projects.
Go to Help > Install New Software.
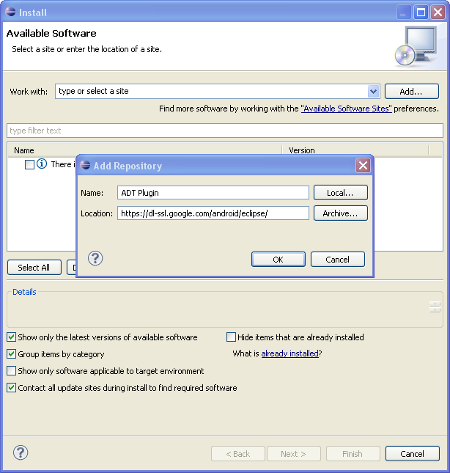
In Available Software dialog, click Add and enter https://dl-ssl.google.com/android/eclipse/ in the Location field. Click OK.
Back in the dialog, the Android DDMS and Android Development Tools features should get listed as shown below.
If this doesn't work, try with https:// instead of https:// for the URL entered previously in the Location field.
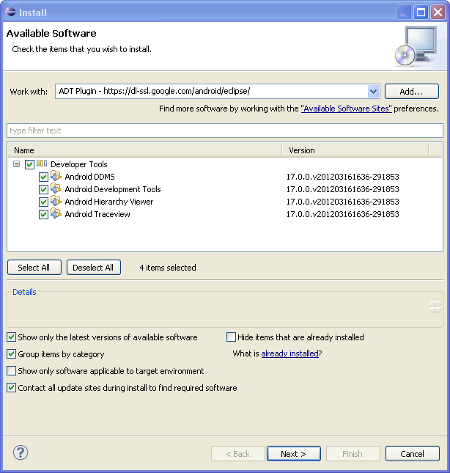
Select the checkbox next to Developer Tools which should select all the features. Click Next, Next, then Finish. This will initiate the download. Once installation completes you should restart Eclipse.
Post restart you'll find new icons
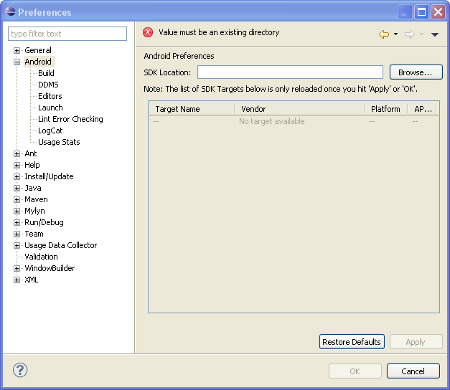
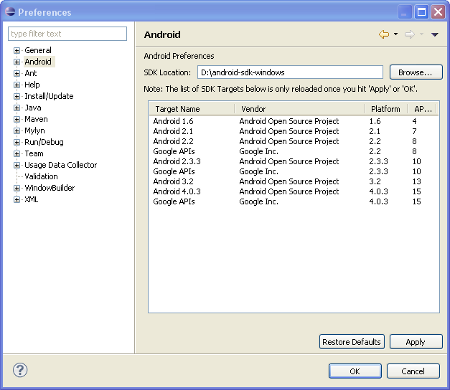
Go to Window > Preferences > Android. Enter the Android SDK install location in the SDK Location field if not already specified. Click OK.
6. Install a Platform
As mentioned earlier, you need to install a platform specific to a API Level on which you build and test your Android application. The Android SDK Manager lets you download other components from the SDK repository site which do not come pre-installed with the SDK.Click on the icon in the Eclipse toolbar to open Android SDK Manager.
Select packages corresponding to the platforms you want to download. It takes a while to download the packages so you may select only the latest API Level for now. You can always come back later and download more packages for other API Levels.
Click Install packages. Accept All in the next screen and click Install.
It is recommended to have multiple platforms installed, so that you can build your application on the lowest version supported, but test against higher versions on which the application is intended to run.
Now if you navigate to Window > Preferences > Android tab again and hit Apply, you should see the installed plaforms listed there.
7. Create new Android Virtual Device (AVD)
Open the Android Virtual Device Manager from the Eclipse toolbar. Click New.In the Create New AVD dialog, enter details for the AVD as shown below. You can play with the device specifications later to simulate a real device.

Enabling Snaphot on the test device lets you save the device state upon closing the Emulator. Also due to this, the device start up time is significantly less on next relaunch of the Emulator.

8. Android Emulator
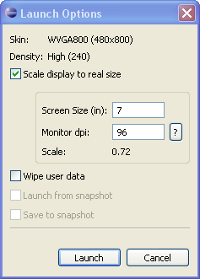
The Android Emulator simulates an Android device on your computer so that you can develop and test your Android application without having a real device. More importantly, you can test your application on different platforms with different device configurations (for ex. display size), as it is not feasible to buy a real device for each of the combinations.Select the virtual device in the AVD Manager window and click Start.
In the Launch Options dialog select options as shown below. Click Launch.
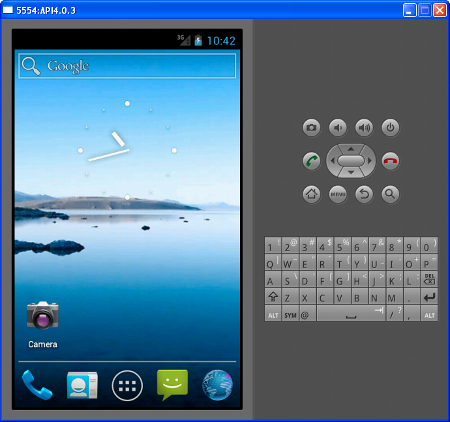
The AVD will take some time to boot up. You will see the Android logo animation for a while before the start-up screen comes up. Unlock the device to see the home screen.
9. Create a New Android Project
In Eclipse, go to File > New > Project and in the New Project dialog, expand Android folder to select Android Project. Click Next.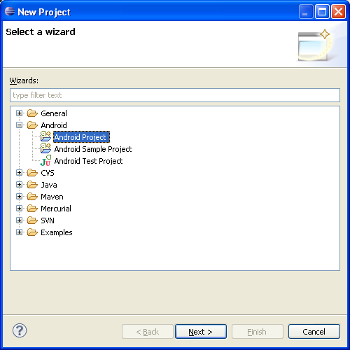
In the resulting New Android Project dialog enter the project details as follows.
Project name: HelloWorld
Build Target: Android 4.0.3
Application name: Hello, World
Package name: com.appsrox.helloworld
Create Activity: MainActivity
Click Finish. The project gets created in your workspace.
Explore the project to see what all stuff was auto generated by the wizard. The project is complete in itself and can be run straightaway.
10. Run the Application
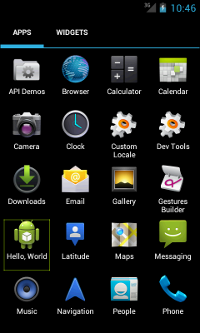
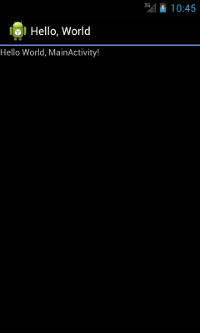
Right click on the project then Run As > Android Application. The emulator will be launched if it is not already running and the application will get installed and started automatically. That's it. Your application is running now and you should see the Hello, World text on the screen.
11. Troubleshooting
The ADT plugin also makes available a new perspective in the IDE called DDMS. If you switch to this perspective, you will find a host of views which aid application debugging and monitoring. The LogCat is particularly important as it shows all the logging done by the system and applications.12. What's next?
We would love to get your feedback and any suggestions to improve this tutorial. If you encounter any particular issue, do let us know by leaving a comment and we would be glad to help you out.You may want to visit the developers site and learn the fundamentals of Android application programming. To start with, the Android components, Activity Lifecycle and Android UI. Once you get familiar with the basics, you can check out our other tutorials in which we tell you how to make some real world apps.