


 Now you can get the latest Java source bundled with each app update. Install the app from Google Play and go to Settings > Extras.
Create an elegantly designed Reminder/Alarm clock application
 Download
Keywords: ListActivity SimpleCursorAdapter SQLiteDatabase AlarmManager NotificationManager IntentService BroadcastReceiver ToggleButton ViewSwitcher DatePicker TimePicker RadioGroup
Contents
- Overview
- Create a new Eclipse Android project
- Define the Data model
- The Android Manifest file
- The Application class
- The Preferences screen
- The Alarm Service
- The Alarm Receiver
- The Alarm Setter
- The Main screen
- The Options Menu
- The Context Menu
- The Edit Dialog
- The New Reminder screen
- Date and Time Controls
13. The Edit Dialog
The Edit dialog is a AlertDialog with a custom layout containing an EditText field which allows user to edit the notification message.
	@Override
	protected Dialog onCreateDialog(int id) {
		switch (id) {
		case R.id.menu_edit:
			return new AlertDialog.Builder(this)
			   .setTitle("Edit")
			   .setView(getLayoutInflater().inflate(R.layout.edit, null))
		       .setCancelable(false)
		       .setPositiveButton("Ok", new DialogInterface.OnClickListener() {
		           public void onClick(DialogInterface dialog, int id) {
		        	   Dialog d = (Dialog) dialog;
		        	   EditText msgEdit = (EditText) d.findViewById(R.id.msg_et);

		        	   if (!TextUtils.isEmpty(msgEdit.getText())) {
							alarm.setMsg(msgEdit.getText().toString());
							// TODO save alarm

							SimpleCursorAdapter adapter = (SimpleCursorAdapter)
															getListAdapter();
							adapter.getCursor().requery();
							adapter.notifyDataSetChanged();

		        	   } else {
		        		   Toast.makeText(MainActivity.this, "Enter a message",
											Toast.LENGTH_SHORT).show();
		        	   }
		           }
		       })
		       .setNegativeButton("Cancel", new DialogInterface.OnClickListener() {
		           public void onClick(DialogInterface dialog, int id) {
		                dialog.cancel();
		           }
		       })
		       .create();
		}
		return super.onCreateDialog(id);
	}

	@Override
	protected void onPrepareDialog(int id, Dialog dialog) {
		super.onPrepareDialog(id, dialog);
		switch (id) {
		case R.id.menu_edit:
			EditText msgEdit = (EditText) dialog.findViewById(R.id.msg_et);
			msgEdit.setText(alarm.getMsg());
			break;
		}
	}
We have overridden onPrepareDialog() method to populate the edit text field with existing message. However, only onCreateDialog() is enough for showing the dialog.
We created a layout file edit.xml for the content view.
	<?xml version="1.0" encoding="utf-8"?>
	<LinearLayout xmlns:android="http://schemas.android.com/apk/res/android"
		android:layout_width="fill_parent"
		android:layout_height="fill_parent"
		android:orientation="vertical" >

		<EditText
			android:id="@+id/msg_et"
			android:layout_width="fill_parent"
			android:layout_height="wrap_content"
			android:ems="10"
			android:maxLines="2"
			android:hint="Message" >
		</EditText>

	</LinearLayout>
14. The New Reminder screen
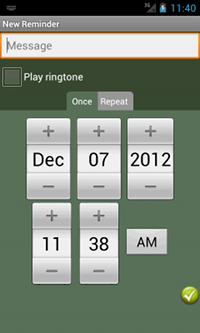
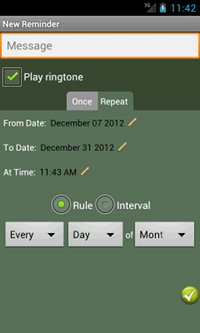
	<ToggleButton
		android:id="@+id/toggleButton"
		android:layout_width="wrap_content"
		android:layout_height="wrap_content"
		android:layout_gravity="center_horizontal"
		android:onClick="onClick"
		android:background="@drawable/type_selector"
		android:textOn=" Once    Repeat "
		android:textOff=" Once    Repeat " />

	<ViewSwitcher
		android:id="@+id/view_switcher"
		android:layout_width="fill_parent"
		android:layout_height="wrap_content" >

		<include layout="@layout/include_onetime"
			android:layout_width="fill_parent"
			android:layout_height="fill_parent" />

		<include layout="@layout/include_repeating"
			android:layout_width="fill_parent"
			android:layout_height="fill_parent" />

	</ViewSwitcher>
We have used <include> tag to simplify the layout. First, let's see how the tabbed look was created using Android State List drawables. Here is the content of type_selector.xml file.
	<?xml version="1.0" encoding="utf-8"?>
	<selector xmlns:android="http://schemas.android.com/apk/res/android">
		<item android:drawable="@drawable/onetime" android:state_checked="true"/>
		<item android:drawable="@drawable/repeating"/>
	</selector>
Where onetime.xml and repeating.xml are Layer List drawables.
	<?xml version="1.0" encoding="utf-8"?>
	<layer-list xmlns:android="http://schemas.android.com/apk/res/android">
		<item>
			<shape>
				<solid
					android:color="@color/inactiv"/>
				<corners
					android:topLeftRadius="5dp"
					android:topRightRadius="15dp" />
			</shape>
		</item>
		<item android:left="50sp">
			<shape>
				<solid
					android:color="@color/activ"/>
				<corners
					android:topRightRadius="5dp" />
			</shape>
		</item>
	</layer-list>
The layout file include_onetime.xml contains a DatePicker and TimePicker widget which we will discuss in more detail later.
	<?xml version="1.0" encoding="utf-8"?>
	<RelativeLayout xmlns:android="http://schemas.android.com/apk/res/android"
		android:layout_width="fill_parent"
		android:layout_height="fill_parent" >

		<DatePicker
			android:id="@+id/datePicker"
			android:layout_width="wrap_content"
			android:layout_height="wrap_content"
			android:layout_centerHorizontal="true" />

		<TimePicker
			android:id="@+id/timePicker"
			android:layout_width="wrap_content"
			android:layout_height="wrap_content"
			android:layout_below="@+id/datePicker"
			android:layout_centerHorizontal="true" />

	</RelativeLayout>
The layout file include_repeating.xml contains the usual widgets apart from a RadioGroup. Here is an excerpt from the file.
    <RadioGroup
        android:id="@+id/radioGroup"
        android:layout_width="wrap_content"
        android:layout_height="wrap_content"
        android:layout_below="@id/attime_lb"
        android:layout_centerHorizontal="true"
        android:orientation="horizontal" >

        <RadioButton
            android:id="@+id/radio0"
            android:layout_width="wrap_content"
            android:layout_height="wrap_content"
            android:checked="true"
            android:text="Rule" />

        <RadioButton
            android:id="@+id/radio1"
            android:layout_width="wrap_content"
            android:layout_height="wrap_content"
            android:text="Interval" />
    </RadioGroup>
Next we will take a look at AddAlarmActivity. It is a simple Activity to create a new alarm and has some logic to make the radio group and view switcher work.