


 Now you can get the latest Java source bundled with each app update. Install the app from Google Play and go to Settings > Extras.
Create an Instant Messaging app using Google Cloud Messaging (GCM)
 Download
Keywords: Google Cloud Messaging Google Play services ContentProvider SQLiteOpenHelper BroadcastReceiver NotificationManager SimpleCursorAdapter CursorLoader ActionBar DialogFragment ListFragment ViewBinder ContentResolver PreferenceFragment Google App Engine Google Plugin JPA Servlet
Contents
- Overview
- Integrating Google Play Services
- Create an API project
- Obtain an API Key
- Create a new Eclipse Android project
- The Android Manifest file
- The Application class
- The Data Model
- The Content Provider
- GCM Utility class
- Server Utility class
- The GCM BroadcastReceiver
- Main Activity
- Add Contact DialogFragment
- Messages ListFragment
- Chat Activity
- Settings screen
- Install the Google Plugin for Eclipse
- Create new Web Application Project
- JPA model
- Servlets
- Deploy to App Engine
- Testing the app
13. The Main Activity
The main screen consists of an ActionBar and a ListView with a custom row layout. We don't create a layout for this screen since the activity gets it from its parent ListActivity.
	public class MainActivity extends ListActivity implements LoaderManager.LoaderCallbacks<Cursor> {

		private SimpleCursorAdapter adapter;

		@Override
		protected void onCreate(Bundle savedInstanceState) {
			super.onCreate(savedInstanceState);

			adapter = new SimpleCursorAdapter(this,
					R.layout.main_list_item,
					null,
					new String[]{DataProvider.COL_NAME, DataProvider.COL_COUNT},
					new int[]{R.id.text1, R.id.text2},
					0);
			adapter.setViewBinder(new SimpleCursorAdapter.ViewBinder() {

				@Override
				public boolean setViewValue(View view, Cursor cursor, int columnIndex) {
					switch(view.getId()) {
					case R.id.text2:
						int count = cursor.getInt(columnIndex);
						if (count > 0) {
							((TextView)view).setText(String.format("%d new message%s", count, count==1 ? "" : "s"));
						}
						return true;
					}
					return false;
				}
			});
			setListAdapter(adapter);

			ActionBar actionBar = getActionBar();
			actionBar.setDisplayShowTitleEnabled(false);
			getLoaderManager().initLoader(0, null, this);
		}

		@Override
		protected void onListItemClick(ListView l, View v, int position, long id) {
			Intent intent = new Intent(this, ChatActivity.class);
			intent.putExtra(Common.PROFILE_ID, String.valueOf(id));
			startActivity(intent);
		}
	}
We use Loader to load the data asynchronously for the list view. This requires the LoaderCallbacks interface to be implemented.
	@Override
	public Loader<Cursor> onCreateLoader(int id, Bundle args) {
		CursorLoader loader = new CursorLoader(this,
				DataProvider.CONTENT_URI_PROFILE,
				new String[]{DataProvider.COL_ID, DataProvider.COL_NAME, DataProvider.COL_COUNT},
				null,
				null,
				DataProvider.COL_ID + " DESC");
		return loader;
	}

	@Override
	public void onLoadFinished(Loader<Cursor> loader, Cursor data) {
		adapter.swapCursor(data);
	}

	@Override
	public void onLoaderReset(Loader<Cursor> loader) {
		adapter.swapCursor(null);
	}
Notice that initLoader() is called in onCreate() method of the activity. This causes the Loader to be initialized and onCreateLoader() method is called by the system. When data is loaded onLoadFinished() method is invoked where we swap the cursor of the list adapter to refresh the list view.
The layout for the list rows is shown below.
	<?xml version="1.0" encoding="utf-8"?>
	<RelativeLayout xmlns:android="http://schemas.android.com/apk/res/android"
		android:layout_width="match_parent"
		android:layout_height="match_parent" >

		<ImageView
			android:id="@+id/avatar"
			android:layout_width="wrap_content"
			android:layout_height="wrap_content"
			android:layout_alignParentLeft="true"
			android:src="@drawable/ic_contact_picture" />

		<TextView
			android:id="@+id/text1"
			android:layout_width="wrap_content"
			android:layout_height="wrap_content"
			android:layout_alignParentTop="true"
			android:layout_toRightOf="@+id/avatar"
			android:textAppearance="?android:attr/textAppearanceLarge" />

		<TextView
			android:id="@+id/text2"
			android:layout_width="wrap_content"
			android:layout_height="wrap_content"
			android:layout_below="@+id/text1"
			android:layout_toRightOf="@+id/avatar"
			android:textAppearance="?android:attr/textAppearanceSmall" />

	</RelativeLayout>
The only thing that is left to be implemented in the main screen are the ActionBar menu items. For this simply update the main.xml resource file under res/menu directory of your project.
	<menu xmlns:android="http://schemas.android.com/apk/res/android" >
		<item
			android:id="@+id/action_add"
			android:showAsAction="always"
			android:icon="@android:drawable/ic_menu_add"
			android:title="@string/action_add"/>

		<item
			android:id="@+id/action_settings"
			android:showAsAction="ifRoom"
			android:icon="@android:drawable/ic_menu_preferences"
			android:title="@string/action_settings"/>
	</menu>
And override the methods related to options menu in the MainActivity class.
	@Override
	public boolean onCreateOptionsMenu(Menu menu) {
		getMenuInflater().inflate(R.menu.main, menu);
		return true;
	}

	@Override
	public boolean onOptionsItemSelected(MenuItem item) {
		switch (item.getItemId()) {
		case R.id.action_add:
			AddContactDialog dialog = new AddContactDialog();
			dialog.show(getFragmentManager(), "AddContactDialog");
			return true;

		case R.id.action_settings:
			Intent intent = new Intent(this, SettingsActivity.class);
			startActivity(intent);
			return true;
		}
		return super.onOptionsItemSelected(item);
	}
14. Add Contact Dialog
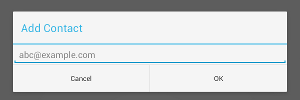 Here is the code for add contact DialogFragment.
public class AddContactDialog extends DialogFragment {

	@Override
	public Dialog onCreateDialog(Bundle savedInstanceState) {
		final Context ctx = getActivity();
		final EditText et = new EditText(ctx);
		et.setInputType(InputType.TYPE_TEXT_VARIATION_EMAIL_ADDRESS);
		et.setHint("abc@example.com");

		final AlertDialog alert = new AlertDialog.Builder(ctx)
			.setTitle("Add Contact")
			.setView(et)
			.setPositiveButton(android.R.string.ok, null)
			.setNegativeButton(android.R.string.cancel, null)
			.create();

		alert.setOnShowListener(new DialogInterface.OnShowListener() {

			@Override
			public void onShow(DialogInterface dialog) {
				Button okBtn = alert.getButton(AlertDialog.BUTTON_POSITIVE);
				okBtn.setOnClickListener(new View.OnClickListener() {

					@Override
					public void onClick(View v) {
						String email = et.getText().toString();
						if (!isEmailValid(email)) {
							et.setError("Invalid email!");
							return;
						}

						try {
							ContentValues values = new ContentValues(2);
							values.put(DataProvider.COL_NAME, email.substring(0, email.indexOf('@')));
							values.put(DataProvider.COL_EMAIL, email);
							ctx.getContentResolver().insert(DataProvider.CONTENT_URI_PROFILE, values);
						} catch (SQLException sqle) {}
						alert.dismiss();
					}
				});
			}
		});
		return alert;
	}

	private boolean isEmailValid(CharSequence email) {
		return android.util.Patterns.EMAIL_ADDRESS.matcher(email).matches();
	}

}
We use a standard AlertDialog and set the content view with an EditText widget. There is a simple email address validation before the contact is added to the database.