


 Now you can get the latest Java source bundled with each app update. Install the app from Google Play and go to Settings > Extras.
Create a Notepad and To-do list combined app in Android
 Download
Keywords: TabHost ListView ExpandableListActivity SQLite SimpleCursorAdapter SimpleCursorTreeAdapter PreferenceActivity AlertDialog ContextMenu Spinner Gallery ScrollView Camera
Contents
- SmartPad
- assets
- fonts
- Font.ttf
- fonts
- res
- xml
- settings.xml
- layout
- tab_manage.xml
- row_checkitem.xml
- auth.xml
- photo.xml
- tab_browse.xml
- gallery_item.xml
- note.xml
- row_category_note.xml
- row_note.xml
- tabindicator.xml
- main.xml
- row_category.xml
- drawable-hdpi
- ok.png
- file.png
- file_locked.png
- folder.png
- voice.png
- lock.png
- more.png
- new_archive.png
- new_doc.png
- delete.png
- pencil.png
- folder_locked.png
- preferences.png
- tab_divider.9.png
- sort.png
- sync.png
- drawable-xhdpi
- ic_launcher.png
- drawable-mdpi
- ic_dialog_menu_generic.png
- ic_input_delete.png
- pattern8_pattern_58c.png
- title_bar_shadow.9.png
- back.png
- add.png
- pictures.png
- embossed_paper.png
- paper.png
- checked.png
- denim.png
- checklist.png
- document.png
- remove.png
- ic_menu_login.png
- ksnapshot.png
- kcamera.png
- unchecked.png
- back_pattern.png
- drawable-v12
- note_bg_selector.xml
- btn_bg2.xml
- values
- arrays.xml
- strings.xml
- colors.xml
- styles.xml
- drawable
- tab_unselected.xml
- btn2_bg.xml
- note_bg_repeat.xml
- photo_bg.xml
- note_bg_selector.xml
- bar_bg_repeat.xml
- btn_bg2.xml
- cb_selector.xml
- tab_txt_selector.xml
- btn_bg.xml
- btn_bg_selector.xml
- tab_bg_selector.xml
- tab_selected.xml
- category_bg_selector.xml
- pad_bg_repeat.xml
- menu
- contextmenu_browse.xml
- optionsmenu_note.xml
- contextmenu_manage.xml
- xml
- src
- com
- appsrox
- smartpad
- note
- ChecklistActivity.java
- BaseActivity.java
- BasicActivity.java
- SnapshotActivity.java
- PhotoActivity.java
- common
- Util.java
- SyncTask.java
- model
- Category.java
- DbHelper.java
- Attachment.java
- BaseModel.java
- Note.java
- AbstractModel.java
- CheckItem.java
- Disclaimer.java
- AuthActivity.java
- BrowseActivity.java
- MainActivity.java
- SmartPad.java
- SettingsActivity.java
- ManageActivity.java
- note
- smartpad
- appsrox
- com
- AndroidManifest.xml
- assets
1. Overview
In this article, we show you how to create a notepad application in Android. The first thing to do after you have your (million dollar?!!) app idea is to list down all the features you want in your app. Then sketch the design and flow of the application before you jump into actual development.Since this is our first app in the series so we will focus more on Android UI layouts and widgets and hence the design of the application and keep things simple functionality wise. However, we will make a pretty decent application with most of the basic features a notepad application should have and may be a little more in some other respect.
Here is the final result we want to achieve and which you might have sketched before getting into coding.
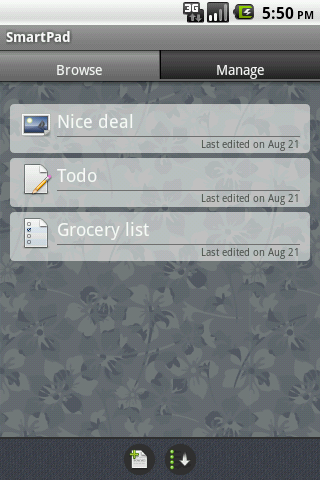
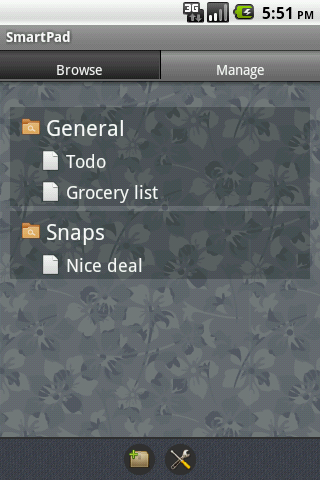
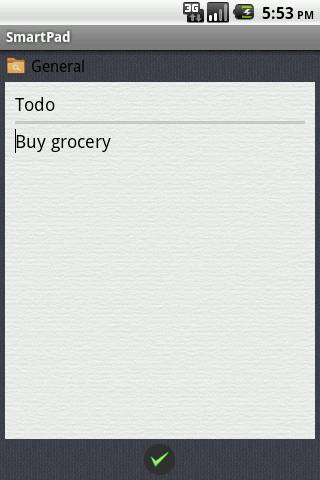
This app allows user to create a simple note, a checklist, or a snapshot. So we will create separate Activity for each of these use cases. We will be using various Android widgets to implement the screens. Additionally, there is a settings screen (not shown above) implemented using PreferenceActivity which allows user to save his preferences.
We will give all the details as we implement each feature so let's start coding!
2. Create a new Eclipse Android project
In Eclipse, go to File > New > Project and in the New Project dialog, expand Android folder to select Android Project.In New Android Project dialog enter the project details as follows.
Project name: SmartPad
Build Target: Android 2.1
Application name: Smart Pad
Package name: com.appsrox.smartpad
Create Activity: MainActivity
Click Finish. The project gets created in your workspace.
It's a good approach to define the data model first before diving into UI implementation so that's what we discuss next.
3. Define the Data model
The app needs to support persistance of a simple note, a checklist, and a snapshot as well as allow user to categorize his notes. Here is a class diagram which depicts the data model.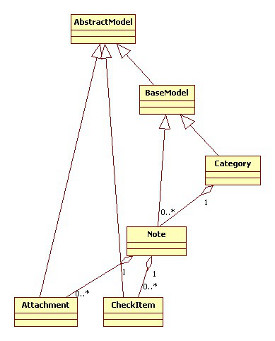 Android provides SQLite database for data persistence and SQLiteOpenHelper class for managing the database. It's an abstract class which we need to subclass and implement the onCreate() and onUpgrade() methods.
Create a package com.appsrox.smartpad.model to hold the data model classes. Additionally, create DbHelper class which extends SQLiteOpenHelper.
Here is some relevant piece of code from DbHelper.java
	@Override
	public void onCreate(SQLiteDatabase db) {
		db.execSQL(Category.getSql());
		db.execSQL(Note.getSql());
		db.execSQL(Attachment.getSql());
		db.execSQL(CheckItem.getSql());
	}

	@Override
	public void onUpgrade(SQLiteDatabase db, int oldVersion, int newVersion) {
		db.execSQL("DROP TABLE IF EXISTS " + Category.TABLE_NAME);
		db.execSQL("DROP TABLE IF EXISTS " + Note.TABLE_NAME);
		db.execSQL("DROP TABLE IF EXISTS " + Attachment.TABLE_NAME);
		db.execSQL("DROP TABLE IF EXISTS " + CheckItem.TABLE_NAME);

		onCreate(db);
	}
We create four tables in the database and the model class corresponding to each table contains logic to insert, update, load, and delete the data.
	SQLiteDatabase db = dbHelper.getWritableDatabase();
	ContentValues cv = new ContentValues();

	// insert
	cv.put(COL_NAME, value);
	db.insert(TABLE_NAME, null, cv);

	// update
	cv.put(COL_NAME, value);
	db.update(TABLE_NAME, cv, COL_ID + " = ?", new String[]{id});

	// load
	Cursor cursor = db.query(TABLE_NAME, null, COL_ID + " = ?",
								new String[]{id}, null, null, null);
	if (cursor.moveToFirst()) {
		String name = cursor.getString(cursor.getColumnIndex(COL_NAME));
	}
	cursor.close();

	//delete
	db.delete(TABLE_NAME, cv, COL_ID + " = ?", new String[]{id});
In db.query() passing the second argument as null fetches all the columns.
You may want to wrap the data manipulation calls in a transaction to improve performance or preserve data integrity.
	db.beginTransaction();
	try {
		// multiple insert, update, or delete

		db.setTransactionSuccessful();
	} catch (Exception e) {
		Log.e(TAG, e.getMessage(), e);
	} finally {
		db.endTransaction();
	}
4. The Android Manifest file
The AndroidManifest.xml describes the Android application. We need to edit this file to declare various components, features, permissions, etc. used by the application.<?xml version="1.0" encoding="utf-8"?> <manifest xmlns:android="http://schemas.android.com/apk/res/android" package="com.appsrox.smartpad" android:versionCode="1" android:versionName="1.0" > <uses-sdk android:minSdkVersion="7" /> <application android:name=".SmartPad" android:icon="@drawable/ic_launcher" android:label="@string/app_name" android:theme="@style/app_theme" > <activity android:name=".MainActivity" android:label="@string/app_name" > <intent-filter> <action android:name="android.intent.action.MAIN" /> <category android:name="android.intent.category.LAUNCHER" /> </intent-filter> </activity> </application> </manifest>We will update this file as and when we add components to our application.
5. The Application class
The Application class is a good place to declare all globals in an application although it's not mandatory. To use it we create a class which extends Application and override the onCreate() method where the variables are instantiated.
	public class SmartPad extends Application {

		public static DbHelper dbHelper;
		public static SQLiteDatabase db;
		public static SharedPreferences sp;

		@Override
		public void onCreate() {
			super.onCreate();
			dbHelper = new DbHelper(this);
			db = dbHelper.getWritableDatabase();

			PreferenceManager.setDefaultValues(this, R.xml.settings, false);
			sp = PreferenceManager.getDefaultSharedPreferences(this);
		}
	}
Also, it needs to be declared in the <application> tag in AndroidManifest.xml which we have already done.
We need to create a settings.xml file under res/xml.
	<?xml version="1.0" encoding="utf-8"?>
	<PreferenceScreen xmlns:android="http://schemas.android.com/apk/res/android" >
		<CheckBoxPreference
			android:key="showLocked"
			android:title="Show Locked Items"
			android:defaultValue="true"
		/>
		<EditTextPreference
			android:key="password"
			android:title="Set Password"
		/>
	</PreferenceScreen>
We will discuss more about SharedPreferences later when we develop the Preference screen.
We have finished all the ground work and this calls for a logical break. Next we will develop the UI and implement the features; the thing that sells your app.