


 Now you can get the latest Java source bundled with each app update. Install the app from Google Play and go to Settings > Extras.
Create an Instant Messaging app using Google Cloud Messaging (GCM)
 Download
Keywords: Google Cloud Messaging Google Play services ContentProvider SQLiteOpenHelper BroadcastReceiver NotificationManager SimpleCursorAdapter CursorLoader ActionBar DialogFragment ListFragment ViewBinder ContentResolver PreferenceFragment Google App Engine Google Plugin JPA Servlet
Contents
- Overview
- Integrating Google Play Services
- Create an API project
- Obtain an API Key
- Create a new Eclipse Android project
- The Android Manifest file
- The Application class
- The Data Model
- The Content Provider
- GCM Utility class
- Server Utility class
- The GCM BroadcastReceiver
- Main Activity
- Add Contact DialogFragment
- Messages ListFragment
- Chat Activity
- Settings screen
- Install the Google Plugin for Eclipse
- Create new Web Application Project
- JPA model
- Servlets
- Deploy to App Engine
- Testing the app
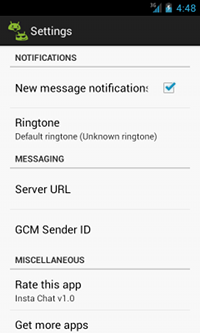
17. Settings screen
 Creating a preferences screen is very easy in Eclipse with the ADT plugin. Right click on the Project and goto New > Other ... and select Android Object in the New dialog. Click Next to view the New Android Object wizard.
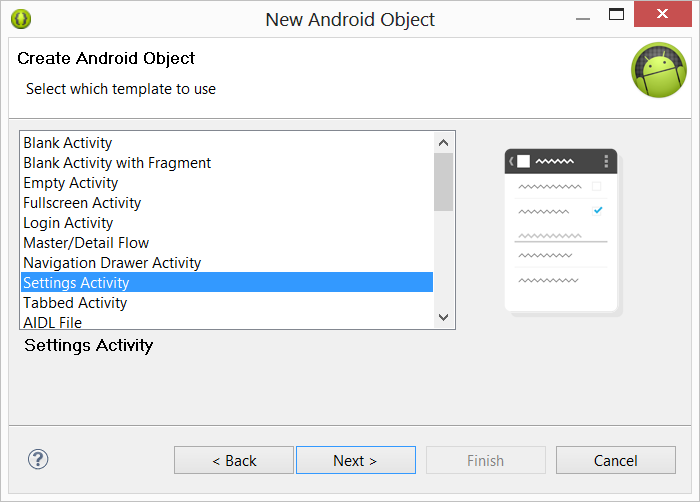 There are standard templates available for various Android Objects. Select Settings Activity and click Next, Next and Finish. The wizard will create a SettingsActivity class, few resource files and update the manifest to register the activity. You can modify the generated files as per your requirements.
There are two important settings in our app i.e. the Server Url and the GCM sender ID. Let's create a new resource pref_messaging.xml under res/xml directory.
	<?xml version="1.0" encoding="utf-8"?>
	<PreferenceScreen xmlns:android="http://schemas.android.com/apk/res/android" >

		<EditTextPreference
			android:inputType="textPassword"
			android:key="server_url_pref"
			android:title="@string/pref_title_server_url" />

		<EditTextPreference
			android:inputType="textPassword"
			android:key="sender_id_pref"
			android:title="@string/pref_title_sender_id" />

	</PreferenceScreen>
Add a new header to the existing pref_headers.xml file under rex/xml.
    <header
        android:fragment="com.appsrox.instachat.SettingsActivity$MessagingPreferenceFragment"
        android:title="@string/pref_header_messaging" />
We need to implement MessagingPreferenceFragment for the new section. Add the following piece of code to SettingsActivity class.
	/**
	 * This fragment shows messaging preferences only.
	 */
	@TargetApi(Build.VERSION_CODES.HONEYCOMB)
	public static class MessagingPreferenceFragment extends PreferenceFragment {
		@Override
		public void onCreate(Bundle savedInstanceState) {
			super.onCreate(savedInstanceState);
			addPreferencesFromResource(R.xml.pref_messaging);
		}
	}
This works for a two-pane layout in case of extra-large screen. However, for smaller screen or pre-Honeycomb Android version the single pane layout is used. So update the method that sets up simple preference screen (eg. setupSimplePreferencesScreen()).
	// Add 'messaging' preferences, and a corresponding header.
	fakeHeader = new PreferenceCategory(this);
	fakeHeader.setTitle(R.string.pref_header_messaging);
	getPreferenceScreen().addPreference(fakeHeader);
	addPreferencesFromResource(R.xml.pref_messaging);
This completes the Messaging section of the Settings screen. You may want to add/update few other preferences in the screen. One such preference is a ListPreference in pref_general.xml that we modified to be used for selecting the chat ID from a list of accounts on the device.
	ListPreference exampleList = (ListPreference) findPreference("chat_email_id");
	exampleList.setEntries(Common.email_arr);
	exampleList.setEntryValues(Common.email_arr);
	exampleList.setValue(Common.getPreferredEmail());

	EditTextPreference exampleText = (EditTextPreference) findPreference("display_name");
	exampleText.setText(Common.getDisplayName());
Add the above code to GeneralPreferenceFragment and setupSimplePreferencesScreen() so the email list and display name gets pre-populated.
Finally, we revisit the Application class and add the following methods to Common.java so the user preferences could be easily accessed from other parts of code.
	public static String getPreferredEmail() {
		return prefs.getString("chat_email_id", email_arr.length==0 ? "" : email_arr[0]);
	}

	public static String getDisplayName() {
		String email = getPreferredEmail();
		return prefs.getString("display_name", email.substring(0, email.indexOf('@')));
	}

	public static boolean isNotify() {
		return prefs.getBoolean("notifications_new_message", true);
	}

	public static String getRingtone() {
		return prefs.getString("notifications_new_message_ringtone", android.provider.Settings.System.DEFAULT_NOTIFICATION_URI.toString());
	}

	public static String getServerUrl() {
		return prefs.getString("server_url_pref", Constants.SERVER_URL);
	}

	public static String getSenderId() {
		return prefs.getString("sender_id_pref", Constants.SENDER_ID);
	}
You may create Constants.java to define default values for the preferences.
	public interface Constants {

		/**
		 * Base URL of the Demo Server (such as http://my_host:8080/gcm-demo)
		 */
		String SERVER_URL = "http://<provide_app_id>.appspot.com";

		/**
		 * Google API project id registered to use GCM.
		 */
		String SENDER_ID = "<provide_project_id>";
	}
Do replace <provide_project_id> with the project number obtained earlier. We'll later update the SERVER_URL when our server implementation is ready.
We chose to implement the server-side using Google App Engine (GAE) with Datastore but you are free to use any web technology that can handle POST request sent by the app.