


 Now you can get the latest Java source bundled with each app update. Install the app from Google Play and go to Settings > Extras.
Build your first pro Android application with Eclipse
 Download
Keywords: AppCompat Fragment ActionBar ViewPager Navigation Drawer LoaderManager SQLiteDatabase CursorLoader SimpleCursorAdapter ContentProvider SQLiteOpenHelper ContentResolver ListFragment ListView GridView DialogFragment Volley Library RequestQueue ImageLoader NetworkImageView
Contents
- Overview
- Create a new Eclipse Android project
- Add Android Support library
- Android manifest
- Application theme
- Application class
- Splash screen
- Login screen
- Help screen
- Settings screen
- Navigation Drawer
- Main screen
- Dialog Fragment
- Content Provider
- Data model
- List Fragment
- Data Adapter
- Grid View
- View Pager
- Detail screen
- Volley Library
- What's next?
- Showcase
- assets
- fonts
- Font.ttf
- fonts
- res
- values-large
- styles.xml
- xml
- pref_notification.xml
- pref_general.xml
- pref_headers.xml
- pref_data_sync.xml
- layout
- fragment_item_pager.xml
- drawer_list_item.xml
- fragment_grid.xml
- fragment_list.xml
- fragment_item_grid.xml
- activity_help.xml
- activity_login.xml
- dialog_item_add.xml
- activity_splash.xml
- fragment_item_list.xml
- fragment_item_detail.xml
- activity_main.xml
- activity_detail.xml
- fragment_content.xml
- values-v11
- styles.xml
- drawable-hdpi
- ic_drawer.png
- drawer_shadow.9.png
- drawable-xhdpi
- ic_launcher.png
- ic_drawer.png
- drawer_shadow.9.png
- drawable-mdpi
- ic_drawer.png
- drawer_shadow.9.png
- bg_login.jpg
- bg_splash.jpg
- values-sw720dp-land
- dimens.xml
- values
- arrays.xml
- dimens.xml
- strings.xml
- strings_activity_login.xml
- colors.xml
- strings_activity_settings.xml
- styles.xml
- drawable
- background_splash.xml
- background_nav_item.xml
- background_nav_item_selected.xml
- background_login.xml
- nav_item_selector.xml
- background_item.xml
- rounded.xml
- menu
- detail.xml
- login.xml
- main.xml
- values-sw600dp
- dimens.xml
- values-large
- libs
- volley.jar
- src
- com
- appsrox
- showcase
- dialog
- AddItemDialog.java
- main
- DataAdapter.java
- ItemGridFragment.java
- ItemDetailFragment.java
- ItemPagerFragment.java
- OnFragmentInteractionListener.java
- ItemListFragment.java
- model
- Data.java
- LoginActivity.java
- DataProvider.java
- App.java
- DrawerActivity.java
- DetailActivity.java
- SplashActivity.java
- HelpActivity.java
- MainActivity.java
- ContentFragment.java
- SettingsActivity.java
- dialog
- showcase
- appsrox
- com
- AndroidManifest.xml
- assets
1. Overview
In this tutorial we show how to build a simple Android application in Eclipse using Android SDK. If you are a beginner in Android then this is a perfect tutorial to learn tips and tricks for building pro Android applications. You'll learn to create an end-to-end mobile application having a decent user interface!We'll cover many widgets and components in Android and use Android support library to create a backward compatible Android application. You'll learn to use Fragments, Loaders, and other best practices suggested by Google. In addition, we'll see how to incorporate Action Bar, Navigation Drawer, View Pager, etc. in an app using AppCompat library to enrich user experience.
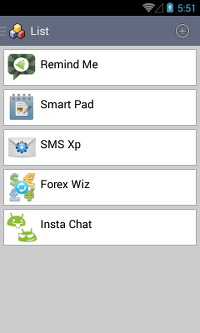
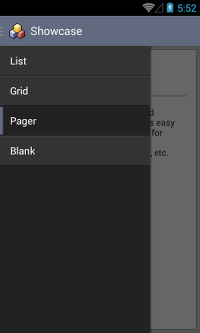
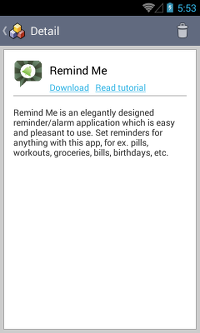
Here are a few screenshots of the app.
So let's get started. If you haven't yet setup the development environment then you might first want to read Setting up Android development environment.
2. Create a new Eclipse Android project
In Eclipse, go to File > New > Project and in the New Project dialog, expand Android folder to select Android Project.In New Android Project dialog enter the project details as follows.
Application Name: Showcase
Project Name: Showcase
Package Name: com.appsrox.showcase
Minimum Required SDK: API 8
Compile With: API 19
Accept the defaults and click Next, Next, Next, Finish. The project gets created in your workspace.
3. Add Android Support library
If you haven't yet downloaded Android Support Library then you can do so through Android SDK Manager.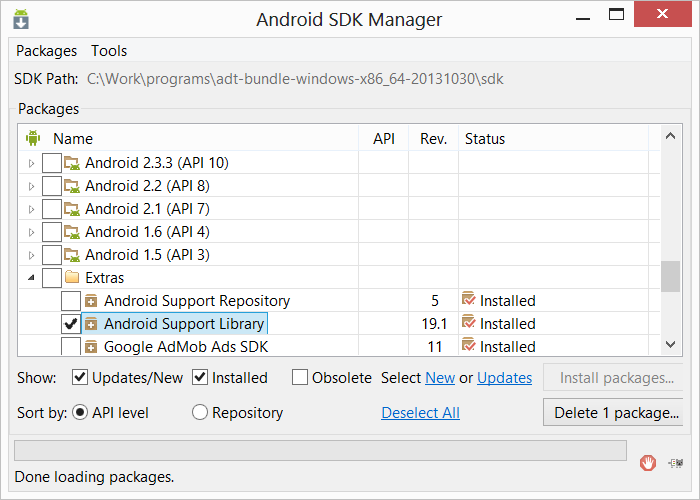 Import the appcompat library project into workspace through File > Import... > Existing Projects into Workspace. The library project can be found at the following location inside Android SDK.
$ANDROID_SDK\extras\android\support\v7\appcompatNext, we need to add android-support-v7-appcompat project as a library to our project. Right click on Showcase project and go to Properties > Android.
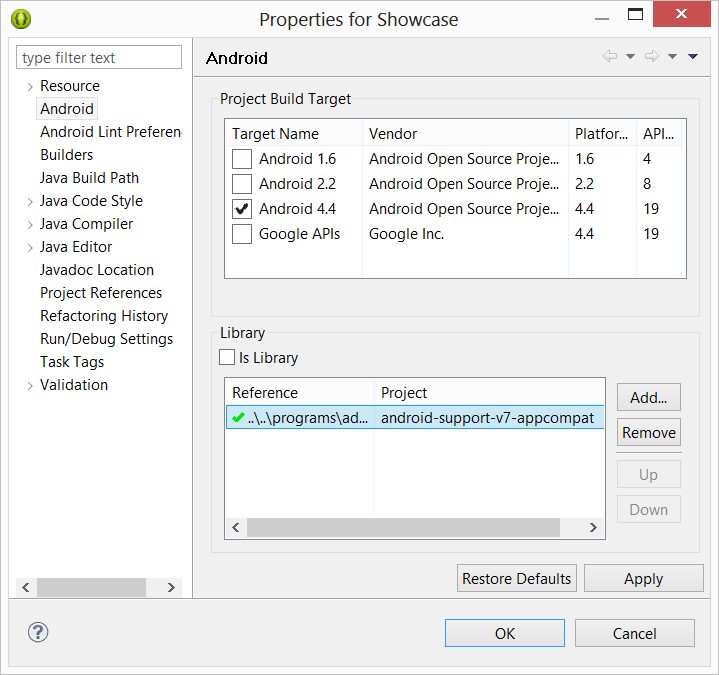 In the Library section, click Add and then select android-support-v7-appcompat and click OK. This will add android-support-v7-appcompat as a library to the project so we can now use newer Android features on older platforms.
4. Android manifest
The AndroidManifest.xml file describes the Android application. We need to edit this file to declare various components, features, permissions, etc. used by the application.We'll modify this file frequently as we develop various components of the application.
	<?xml version="1.0" encoding="utf-8"?>
	<manifest xmlns:android="https://schemas.android.com/apk/res/android"
		package="com.appsrox.showcase"
		android:versionCode="1"
		android:versionName="1.0" >

		<uses-sdk
			android:minSdkVersion="8"
			android:targetSdkVersion="19" />

		<uses-permission android:name="android.permission.INTERNET" />

		<application
			android:name="com.appsrox.showcase.App"
			android:allowBackup="true"
			android:icon="@drawable/ic_launcher"
			android:label="@string/app_name"
			android:theme="@style/AppTheme" >
		</application>

	</manifest>
For now, we've included INTERNET permission and specified an Application class for the project.
5. Application theme
The application theme is specified in the manifest through android:theme attribute of <application> tag. The theme is defined in styles.xml file under res/values and res/values-v11 etc.Since we are using appcompat library, we need to change the default themes to AppCompat version. Let's take a look at styles.xml file under res/values directory.
	<?xml version="1.0" encoding="utf-8"?>
	<resources>

		<style name="AppBaseTheme" parent="@style/Theme.AppCompat.Light.DarkActionBar">

			<!-- Support library compatibility -->
			<item name="actionBarStyle">@style/MyActionBar</item>
		</style>

		<!-- Application theme. -->
		<style name="AppTheme" parent="AppBaseTheme">
			<!-- All customizations that are NOT specific to a particular API-level can go here. -->
			<item name="android:windowBackground">@color/background_light</item>
		</style>

		<!-- ActionBar styles -->
		<style name="MyActionBar"
			   parent="@style/Widget.AppCompat.Light.ActionBar.Solid.Inverse">
			<item name="android:background">@color/background</item>

			<!-- Support library compatibility -->
			<item name="background">@color/background</item>
		</style>

	</resources>
We take this opportunity to customize the app background and action bar as well. The colors are defined in colors.xml file under res/values directory.
	<?xml version="1.0" encoding="utf-8"?>
	<resources>
		<item name="opaque" type="color">#cc000000</item>
		<item name="background" type="color">#616A7F</item>
		<item name="opaque_background" type="color">#55616A7F</item>
		<item name="background_light" type="color">#cccccc</item>
		<item name="background_dark" type="color">#222222</item>
	</resources>
Don't forget to update the styles.xml under res/values-v11 directory to support API 11 onwards.
	<resources>

		<!--
			Base application theme for API 11+. This theme completely replaces
			AppBaseTheme from res/values/styles.xml on API 11+ devices.
		-->
		<style name="AppBaseTheme" parent="@style/Theme.AppCompat.Light.DarkActionBar">
			<!-- API 11 theme customizations can go here. -->
			<item name="android:actionBarStyle">@style/MyActionBar</item>

			<!-- Support library compatibility -->
			<item name="actionBarStyle">@style/MyActionBar</item>
		</style>

	</resources>
You can learn more about Styling the Action Bar from Android Developers site.
6. Application class
The Application class is a good place to declare all globals in an application although it's not mandatory. To use it we create a class which extends android.app.Application and override onCreate() method where the variables are instantiated.
	public class App extends Application {

		private static App sInstance;

		public static App getInstance(){
			return sInstance;
		}

		@Override
		public void onCreate() {
			super.onCreate();
			sInstance = this;
		}

	}
Notice that in AndroidManifest.xml we have declared the Application class using the <application> tag. We'll revisit this class in a later section.