


 Now you can get the latest Java source bundled with each app update. Install the app from Google Play and go to Settings > Extras.
Build your first pro Android application with Eclipse
 Download
Keywords: AppCompat Fragment ActionBar ViewPager Navigation Drawer LoaderManager SQLiteDatabase CursorLoader SimpleCursorAdapter ContentProvider SQLiteOpenHelper ContentResolver ListFragment ListView GridView DialogFragment Volley Library RequestQueue ImageLoader NetworkImageView
Contents
- Overview
- Create a new Eclipse Android project
- Add Android Support library
- Android manifest
- Application theme
- Application class
- Splash screen
- Login screen
- Help screen
- Settings screen
- Navigation Drawer
- Main screen
- Dialog Fragment
- Content Provider
- Data model
- List Fragment
- Data Adapter
- Grid View
- View Pager
- Detail screen
- Volley Library
- What's next?
9. Help screen
 Create a new activity through Eclipse wizard. Go to File > New > Other... and select Android Activity. Click Next and select Blank Activity. Click Next then enter activity name as HelpActivity. Click Finish.
The activity class and layout file gets generated for you. Now add a new method dismiss() to the class that finishes the activity.
	public class HelpActivity extends FragmentActivity {

		@Override
		protected void onCreate(Bundle savedInstanceState) {
			super.onCreate(savedInstanceState);
			setContentView(R.layout.activity_help);
		}

		public void dismiss(View v) {
			finish();
		}

	}
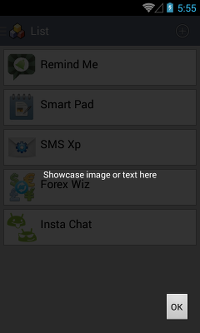
This dismiss() method will be invoked on clicking OK button as seen in the screenshot. Let's edit activity_help.xml to make the desired UI.
	<RelativeLayout xmlns:android="http://schemas.android.com/apk/res/android"
		xmlns:tools="http://schemas.android.com/tools"
		android:layout_width="match_parent"
		android:layout_height="match_parent"
		android:paddingBottom="@dimen/activity_vertical_margin"
		android:paddingLeft="@dimen/activity_horizontal_margin"
		android:paddingRight="@dimen/activity_horizontal_margin"
		android:paddingTop="@dimen/activity_vertical_margin"
		android:background="@color/opaque"
		tools:context=".HelpActivity" >

		<TextView
			android:layout_width="wrap_content"
			android:layout_height="wrap_content"
			android:layout_centerInParent="true"
			android:textColor="@android:color/white"
			android:text="@string/help_text" />

		<Button
			android:id="@+id/button1"
			android:layout_width="wrap_content"
			android:layout_height="wrap_content"
			android:layout_alignParentBottom="true"
			android:layout_alignParentRight="true"
			android:onClick="dismiss"
			android:text="OK" />

	</RelativeLayout>
Notice that dismiss() method we created in the activity is specified as onClick handler of the button. We have kept the help screen simple by just adding a text. However, you may choose to dsiplay images as well.
Transparency of the screen is obtained by specifying Translucent theme for HelpActivity in the manifest.
        <activity
            android:name="com.appsrox.showcase.HelpActivity"
            android:theme="@android:style/Theme.Translucent.NoTitleBar" >
        </activity>
Also, we have set an opaque background to the root element in the layout file. The opaque color was defined previously in colors.xml file under res/values directory.
<item name="opaque" type="color">#cc000000</item>The only thing that is left is to launch the help screen from main screen when user visits it for the first time. Modify onCreate() method in MainActivity class as follows.
	private SharedPreferences prefs;

	@Override
	protected void onCreate(Bundle savedInstanceState) {
		super.onCreate(savedInstanceState);
		setContentView(R.layout.activity_main);

		prefs = getPreferences(Context.MODE_PRIVATE);
		if (prefs.getBoolean("firstLaunch", true)) {
			prefs.edit().putBoolean("firstLaunch", false).commit();
			startActivity(new Intent(getApplicationContext(), HelpActivity.class));
		}
	}
You may want to visit the official Android design patterns page on Help screen.
10. Settings screen
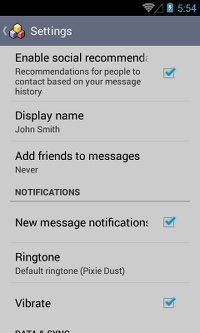 We'll again take help of Eclipse wizard to create a settings screen. The ADT does a good job in generating files required for creating a default settings screen as shown in the screenshot above.
Go to File > New > Other... and select Android Activity. Click Next then select Settings Activity. Click Next and specify Hierarchical Parent as MainActivity. Click Finish.
SettingsActivity inherits from PreferenceActivity and contains code to handle various device sizes and orientation apart from handling preference values. Take some time to go through the class.
In addition to the activity class, few XML files gets generated under res/xml directory. These XML files correspond to each PreferenceScreen. Note that there is no explicit layout file for settings screen. Here is an example of one such file pref_general.xml.
	<PreferenceScreen xmlns:android="http://schemas.android.com/apk/res/android" >

		<CheckBoxPreference
			android:defaultValue="true"
			android:key="example_checkbox"
			android:summary="@string/pref_description_social_recommendations"
			android:title="@string/pref_title_social_recommendations" />

		<EditTextPreference
			android:capitalize="words"
			android:defaultValue="@string/pref_default_display_name"
			android:inputType="textCapWords"
			android:key="example_text"
			android:maxLines="1"
			android:selectAllOnFocus="true"
			android:singleLine="true"
			android:title="@string/pref_title_display_name" />

		<ListPreference
			android:defaultValue="-1"
			android:entries="@array/pref_example_list_titles"
			android:entryValues="@array/pref_example_list_values"
			android:key="example_list"
			android:negativeButtonText="@null"
			android:positiveButtonText="@null"
			android:title="@string/pref_title_add_friends_to_messages" />

	</PreferenceScreen>
You may edit these pref files to add or remove preferences and change accordingly in SettingsActivity class.
There is also a pref_headers.xml file that defines the headers for each PreferenceScreen on tablets (i.e large screens). If you add/remove a preference screen then you'll need to edit this file as well.
	<preference-headers xmlns:android="http://schemas.android.com/apk/res/android" >

		 <header
			android:fragment="com.appsrox.showcase.SettingsActivity$GeneralPreferenceFragment"
			android:title="@string/pref_header_general" />
		<header
			android:fragment="com.appsrox.showcase.SettingsActivity$NotificationPreferenceFragment"
			android:title="@string/pref_header_notifications" />
		<header
			android:fragment="com.appsrox.showcase.SettingsActivity$DataSyncPreferenceFragment"
			android:title="@string/pref_header_data_sync" />

	</preference-headers>
Next, modify MainActivity class to launch Settings screen on selecting menu item.
	@Override
	public boolean onOptionsItemSelected(MenuItem item) {
		switch (item.getItemId()) {
		case R.id.action_settings:
			startActivity(new Intent(this, SettingsActivity.class));
			return true;
		}
		return super.onOptionsItemSelected(item);
	}
We need to add an item for Settings in menu/main.xml as well.
	<menu xmlns:android="http://schemas.android.com/apk/res/android"
		xmlns:myapp="http://schemas.android.com/apk/res-auto" >

		<item
			android:id="@+id/action_settings"
			android:orderInCategory="100"
			android:showAsAction="never"
			android:title="@string/action_settings"/>

	</menu>
This completes the flow, so user can now access the Settings screen from main screen through the menu options.