


 Now you can get the latest Java source bundled with each app update. Install the app from Google Play and go to Settings > Extras.
Build your first pro Android application with Eclipse
 Download
Keywords: AppCompat Fragment ActionBar ViewPager Navigation Drawer LoaderManager SQLiteDatabase CursorLoader SimpleCursorAdapter ContentProvider SQLiteOpenHelper ContentResolver ListFragment ListView GridView DialogFragment Volley Library RequestQueue ImageLoader NetworkImageView
Contents
- Overview
- Create a new Eclipse Android project
- Add Android Support library
- Android manifest
- Application theme
- Application class
- Splash screen
- Login screen
- Help screen
- Settings screen
- Navigation Drawer
- Main screen
- Dialog Fragment
- Content Provider
- Data model
- List Fragment
- Data Adapter
- Grid View
- View Pager
- Detail screen
- Volley Library
- What's next?
12. Main screen
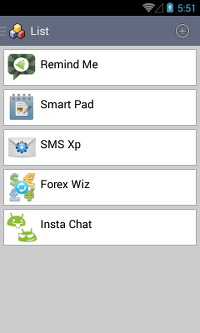 The main screen essentially consists of an action bar at top and content area below it. The action bar includes a button to add new item. The content area is occupied by a fragment which is selected through navigation drawer as discussed in previous section.
Let's revisit the MainActivity class.
	public class MainActivity extends DrawerActivity implements OnFragmentInteractionListener {

		private SharedPreferences prefs;

		@Override
		protected void onCreate(Bundle savedInstanceState) {
			super.onCreate(savedInstanceState);
	//		setContentView(R.layout.activity_main);

			prefs = getPreferences(Context.MODE_PRIVATE);
			if (prefs.getBoolean("firstLaunch", true)) {
				prefs.edit().putBoolean("firstLaunch", false).commit();
				startActivity(new Intent(getApplicationContext(), HelpActivity.class));
			}
		}

		@Override
		public boolean onCreateOptionsMenu(Menu menu) {
			// Inflate the menu; this adds items to the action bar if it is present.
			getMenuInflater().inflate(R.menu.main, menu);
			return true;
		}

		@Override
		public boolean onOptionsItemSelected(MenuItem item) {
			switch (item.getItemId()) {
			case R.id.action_add:
				AddItemDialog dialog = new AddItemDialog();
				dialog.show(getSupportFragmentManager(), "AddItemDialog");
				return true;

			case R.id.action_settings:
				startActivity(new Intent(this, SettingsActivity.class));
				return true;
			}
			return super.onOptionsItemSelected(item);
		}

		@Override
		public void onItemSelected(long id) {
			Intent detailIntent = new Intent(this, DetailActivity.class);
			detailIntent.putExtra(ItemDetailFragment.ARG_ITEM_ID, id);
			startActivity(detailIntent);
		}

	}
You are already familiar with this class. However, notice the new addition of AddItemDialog which we'll discuss in the next section.
Let's take a look at layout activity_main.xml as well.
	<android.support.v4.widget.DrawerLayout
		xmlns:android="http://schemas.android.com/apk/res/android"
		android:id="@+id/drawer_layout"
		android:layout_width="match_parent"
		android:layout_height="match_parent">

		<!-- As the main content view, the view below consumes the entire
			 space available using match_parent in both dimensions. -->
		<FrameLayout
			android:id="@+id/content_frame"
			android:layout_width="match_parent"
			android:layout_height="match_parent" />

		<!-- android:layout_gravity="start" tells DrawerLayout to treat
			 this as a sliding drawer on the left side for left-to-right
			 languages and on the right side for right-to-left languages.
			 The drawer is given a fixed width in dp and extends the full height of
			 the container. A solid background is used for contrast
			 with the content view. -->
		<ListView
			android:id="@+id/left_drawer"
			android:layout_width="240dp"
			android:layout_height="match_parent"
			android:layout_gravity="start"
			android:choiceMode="singleChoice"
			android:divider="@null"
			android:dividerHeight="0dp"
			android:background="#222222"/>
	</android.support.v4.widget.DrawerLayout>
The layout is same as before. The place holder FrameLayout is replaced by actual content based on the selection in navigation drawer. For this demo application we take this opportunity to display content in various formats such as list, grid, pager, etc. and in the process learn how to use the widgets ListView, GridView, and ViewPager.
We'll cover all these widgets in separate sections later.
13. Dialog Fragment
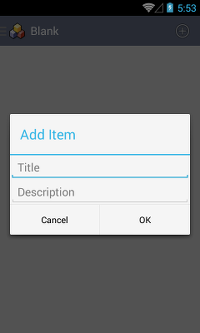 The Add item dialog is a DialogFragment which allows user to add new item.
Create a new AddItemDialog class that inherits from DialogFragment and override the onCreateDialog() method.
	public class AddItemDialog extends DialogFragment {

		@Override
		public Dialog onCreateDialog(Bundle savedInstanceState) {
			final Context ctx = getActivity();
			LayoutInflater inflater = getActivity().getLayoutInflater();

			View rootView = inflater.inflate(R.layout.dialog_item_add, null, false);
			final EditText editText1 = (EditText) rootView.findViewById(R.id.editText1);
			final EditText editText2 = (EditText) rootView.findViewById(R.id.editText2);

			return new AlertDialog.Builder(ctx)
			.setTitle("Add Item")
			.setView(rootView)
			.setPositiveButton(android.R.string.ok, new DialogInterface.OnClickListener() {

				@Override
				public void onClick(DialogInterface dialog, int which) {
					editText1.setError(null);

					String title = editText1.getText().toString();
					String desc = editText2.getText().toString();
					if (TextUtils.isEmpty(title)) {
						editText1.setError(getString(R.string.error_field_required));
						return;
					}

					try {
						Data data = new Data(title, desc, null, null, null);

						ContentValues values = new ContentValues(1);
						values.put(DataProvider.COL_CONTENT, data.toString());
						ctx.getContentResolver().insert(DataProvider.CONTENT_URI_DATA, values);
					} catch (SQLException sqle) {}
				}
			})
			.setNegativeButton(android.R.string.cancel, null)
			.create();
		}

	}
Ignore the code inside try catch block for now as we'll discuss about ContentProvider in next section.
We'll next create a custom layout as shown in the screenshot. The layout is pretty straight forward with just two EditText widgets.
	<?xml version="1.0" encoding="utf-8"?>
	<LinearLayout xmlns:android="http://schemas.android.com/apk/res/android"
		android:layout_width="match_parent"
		android:layout_height="match_parent"
		android:orientation="vertical" >

		<EditText
			android:id="@+id/editText1"
			android:layout_width="match_parent"
			android:layout_height="wrap_content"
			android:hint="@string/title_text"
			android:ems="10" >

			<requestFocus />
		</EditText>

		<EditText
			android:id="@+id/editText2"
			android:layout_width="match_parent"
			android:layout_height="wrap_content"
			android:hint="@string/desc_text"
			android:ems="10"
			android:inputType="textMultiLine" />

	</LinearLayout>
We'll next take up ContentProvider which allows us to persist data in a local SQLite database.