


 Now you can get the latest Java source bundled with each app update. Install the app from Google Play and go to Settings > Extras.
Create a game like Flappy Bird in Android using AndEngine
 Download
Keywords: AndEngine AndEnginePhysicsBox2DExtension SimpleBaseGameActivity ResourceManager SceneManager MenuScene CameraScene AutoParallaxBackground AnimatedSprite DynamicSpriteBatch TiledSprite Sound Music HUD Font PhysicsHandler GenericPool PhysicsWorld Fixture Body ContactListener
Contents- Overview
- Create a new Eclipse Android project
- Add AndEngine library
- Add AndEngine Physics Box2D extension
- Android manifest
- AndEngine concepts
- Game Activity
- Resource Manager
- TextureAtlas & TextureRegion
- Font
- Sound & Music
- Scene Manager
- Base Scene
- Splash Scene
- Main Menu Scene
- Sub Menu Scene
- Game Scene
- Auto Parallax Background
- HUD
- Bird
- Pipes
- Generic Pool
- Physics World
- Body & Fixture
- Contact Listener
- Camera Scene
- What's next?
15. Main Menu Scene
 The main menu scene essentially contains a MenuScene as a child scene to display menu items. We need to set onclick listener on the menu items to handle menu item selection by user.
Let's first take a look at the basic structure of the new class for main menu scene. The class additionally implements IOnMenuItemClickListener interface.
	public class MainMenuScene extends BaseScene implements IOnMenuItemClickListener {

		protected MenuScene mMenuScene;
		private MenuScene mSubMenuScene;

		@Override
		public void createScene() {
			AutoParallaxBackground autoParallaxBackground = new AutoParallaxBackground(0, 0, 0, 0);
			autoParallaxBackground.attachParallaxEntity(new ParallaxEntity(0.0f, new Sprite(0, SCREEN_HEIGHT - mResourceManager.mParallaxLayerBack.getHeight(), mResourceManager.mParallaxLayerBack, mVertexBufferObjectManager)));
			autoParallaxBackground.attachParallaxEntity(new ParallaxEntity(0.0f, new Sprite(0, SCREEN_HEIGHT - mResourceManager.mParallaxLayerFront.getHeight(), mResourceManager.mParallaxLayerFront, mVertexBufferObjectManager)));
			setBackground(autoParallaxBackground);

			Text nameText = new Text(0, 0, mResourceManager.mFont2, "Flappy Chick", new TextOptions(HorizontalAlign.LEFT), mVertexBufferObjectManager);
			nameText.setPosition((SCREEN_WIDTH - nameText.getWidth())/2f, 75);
			attachChild(nameText);

			final float birdX = (SCREEN_WIDTH - mResourceManager.mBirdTextureRegion.getWidth()) / 2;
			final float birdY = nameText.getY() + nameText.getHeight() + 25;
			TiledSprite bird = new TiledSprite(birdX, birdY, mResourceManager.mBirdTextureRegion, mVertexBufferObjectManager);
			bird.setRotation(-15);
			attachChild(bird);

			mMenuScene = createMenuScene();
			mSubMenuScene = createSubMenuScene();

			/* Attach the menu. */
			this.setChildScene(mMenuScene, false, true, true);

			if (!mResourceManager.mMusic.isPlaying()) {
				mResourceManager.mMusic.play();
			}
		}

		@Override
		public boolean onMenuItemClicked(final MenuScene pMenuScene, final IMenuItem pMenuItem, final float pMenuItemLocalX, final float pMenuItemLocalY) {
			//TODO implement
		}

		protected MenuScene createMenuScene() {
			//TODO implement
			return null;
		}

		protected MenuScene createSubMenuScene() {
			//TODO implement
			return null;
		}

		@Override
		public void onBackKeyPressed() {
			if (mMenuScene.hasChildScene())
				mSubMenuScene.back();
			else
				mActivity.finish();
		}

		@Override
		public SceneType getSceneType() {
			return SceneType.SCENE_MENU;
		}

		@Override
		public void disposeScene() {
			//TODO
		}

	}
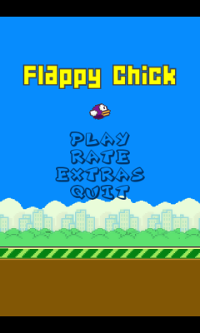
Let's first discuss the usual (non-menu) stuff in the scene. The background is set to auto parallax but it doesn't move since pParallaxChangePerSecond is set as 0. We'll make it auto-moving in the game scene.
The sky and ground are parallax entity attached to the background. The label 'Flappy Chick' and the bird are entities attached to the scene.
Notice that we start playing music when the menu scene is created. But we should also pause it when the app goes into background.
At this point you may want to download and try the game if you haven't already done so.
Add the following piece of code in GameActivity class.
	@Override
	protected void onPause() {
		if (mResourceManager.mMusic!=null && mResourceManager.mMusic.isPlaying()) {
			mResourceManager.mMusic.pause();
		}
		super.onPause();
	}
Now, we can get back to the details of implementing menu scene. The relevant line of code in createScene() is for attaching MenuScene as a child scene. But we need to first create a menu scene.
Add the following piece of code in MainMenuScene class.
		protected static final int MENU_PLAY = 0;
		protected static final int MENU_RATE = 1;
		protected static final int MENU_EXTRAS = 2;
		protected static final int MENU_QUIT = 3;

		protected MenuScene createMenuScene() {
			final MenuScene menuScene = new MenuScene(mCamera);

			final IMenuItem playMenuItem = new ColorMenuItemDecorator(new TextMenuItem(MENU_PLAY, mResourceManager.mFont3, "Play", mVertexBufferObjectManager), new Color(1,1,1), new Color(0.0f, 0.2f, 0.4f));
			playMenuItem.setBlendFunction(GLES20.GL_SRC_ALPHA, GLES20.GL_ONE_MINUS_SRC_ALPHA);
			menuScene.addMenuItem(playMenuItem);

			final IMenuItem rateMenuItem = new ColorMenuItemDecorator(new TextMenuItem(MENU_RATE, mResourceManager.mFont3, "Rate", mVertexBufferObjectManager), new Color(1,1,1), new Color(0.0f, 0.2f, 0.4f));
			rateMenuItem.setBlendFunction(GLES20.GL_SRC_ALPHA, GLES20.GL_ONE_MINUS_SRC_ALPHA);
			menuScene.addMenuItem(rateMenuItem);

			final IMenuItem extrasMenuItem = new ColorMenuItemDecorator(new TextMenuItem(MENU_EXTRAS, mResourceManager.mFont3, "Extras", mVertexBufferObjectManager), new Color(1,1,1), new Color(0.0f, 0.2f, 0.4f));
			extrasMenuItem.setBlendFunction(GLES20.GL_SRC_ALPHA, GLES20.GL_ONE_MINUS_SRC_ALPHA);
			menuScene.addMenuItem(extrasMenuItem);

			final IMenuItem quitMenuItem = new ColorMenuItemDecorator(new TextMenuItem(MENU_QUIT, mResourceManager.mFont3, "Quit", mVertexBufferObjectManager), new Color(1,1,1), new Color(0.0f, 0.2f, 0.4f));
			quitMenuItem.setBlendFunction(GLES20.GL_SRC_ALPHA, GLES20.GL_ONE_MINUS_SRC_ALPHA);
			menuScene.addMenuItem(quitMenuItem);

			menuScene.buildAnimations();

			menuScene.setBackgroundEnabled(false);

			menuScene.setOnMenuItemClickListener(this);
			return menuScene;
		}
Basically, we create menu items and add them to the menu. The text menu items have different colors specified for selected and unselected state.
You can also use image as a menu item instead of text with SpriteMenuItem.
Next, the class is set as onclick listener for the menu items. So we've to implement onMenuItemClicked() method of IOnMenuItemClickListener interface.
	@Override
	public boolean onMenuItemClicked(final MenuScene pMenuScene, final IMenuItem pMenuItem, final float pMenuItemLocalX, final float pMenuItemLocalY) {

		switch(pMenuItem.getID()) {
			case MENU_PLAY:
				if (mResourceManager.mMusic.isPlaying()) {
					mResourceManager.mMusic.pause();
				}
				mMenuScene.closeMenuScene();
				mSceneManager.setScene(SceneType.SCENE_GAME);
				return true;

			case MENU_RATE:
		    	//TODO implement
				return true;

			case MENU_EXTRAS:
				pMenuScene.setChildSceneModal(mSubMenuScene);
				return true;

			case MENU_QUIT:
				/* End Activity. */
				mActivity.finish();
				return true;

			default:
				return false;
		}
	}
We handle individual menu item in switch case. In case of play, we pause music before switching to game scene.
We'll next see how to create submenus.
16. Sub Menu Scene
A submenu scene is also a MenuScene but it is attached to the parent menu scene as modal child scene.case MENU_EXTRAS: pMenuScene.setChildSceneModal(mSubMenuScene); return true;We're showing submenu for 'Extras' menu option. Let's take a look at the code relevant to the submenu.
	protected static final int MENU_READ = 4;
	protected static final int MENU_MORE = 5;

	@Override
	public boolean onMenuItemClicked(final MenuScene pMenuScene, final IMenuItem pMenuItem, final float pMenuItemLocalX, final float pMenuItemLocalY) {

		switch(pMenuItem.getID()) {
			//...

			case MENU_READ:
				mSubMenuScene.back();
				//TODO implement
				return true;

			case MENU_MORE:
				mSubMenuScene.back();
				//TODO implement
				return true;

			default:
				return false;
		}
	}

	protected MenuScene createSubMenuScene() {
		final MenuScene subMenuScene = new MenuScene(mCamera);

		final IMenuItem moreMenuItem = new ColorMenuItemDecorator(new TextMenuItem(MENU_MORE, mResourceManager.mFont3, "More Apps", mVertexBufferObjectManager), new Color(1,1,1), new Color(0.0f, 0.2f, 0.4f));
		moreMenuItem.setBlendFunction(GLES20.GL_SRC_ALPHA, GLES20.GL_ONE_MINUS_SRC_ALPHA);
		subMenuScene.addMenuItem(moreMenuItem);

		final IMenuItem readMenuItem = new ColorMenuItemDecorator(new TextMenuItem(MENU_READ, mResourceManager.mFont3, "Read Tutorial", mVertexBufferObjectManager), new Color(1,1,1), new Color(0.0f, 0.2f, 0.4f));
		readMenuItem.setBlendFunction(GLES20.GL_SRC_ALPHA, GLES20.GL_ONE_MINUS_SRC_ALPHA);
		subMenuScene.addMenuItem(readMenuItem);

		subMenuScene.setMenuAnimator(new SlideMenuAnimator());
		subMenuScene.buildAnimations();

		subMenuScene.setBackgroundEnabled(false);

		subMenuScene.setOnMenuItemClickListener(this);
		return subMenuScene;
	}

	@Override
	public void onBackKeyPressed() {
		if (mMenuScene.hasChildScene())
			mSubMenuScene.back();
		else
			mActivity.finish();
	}
The code is similar to creating a normal menu. Additionally, we set slide animation to the submenu when it opens up.
The other thing to notice is in onBackKeyPressed() method the back key is handled differently for menu and submenu.