


 Now you can get the latest Java source bundled with each app update. Install the app from Google Play and go to Settings > Extras.
Create an Instant Messaging app using Google Cloud Messaging (GCM)
 Download
Keywords: Google Cloud Messaging Google Play services ContentProvider SQLiteOpenHelper BroadcastReceiver NotificationManager SimpleCursorAdapter CursorLoader ActionBar DialogFragment ListFragment ViewBinder ContentResolver PreferenceFragment Google App Engine Google Plugin JPA Servlet
Contents
- Overview
- Integrating Google Play Services
- Create an API project
- Obtain an API Key
- Create a new Eclipse Android project
- The Android Manifest file
- The Application class
- The Data Model
- The Content Provider
- GCM Utility class
- Server Utility class
- The GCM BroadcastReceiver
- Main Activity
- Add Contact DialogFragment
- Messages ListFragment
- Chat Activity
- Settings screen
- Install the Google Plugin for Eclipse
- Create new Web Application Project
- JPA model
- Servlets
- Deploy to App Engine
- Testing the app
15. Messages ListFragment
 For the chat screen create a layout file activity_chat.xml with the following content.
	<LinearLayout xmlns:android="http://schemas.android.com/apk/res/android"
		android:layout_width="match_parent"
		android:layout_height="match_parent"
		android:orientation="vertical"
		android:background="@android:color/darker_gray" >

		<fragment
			android:name="com.appsrox.instachat.MessagesFragment"
			android:id="@+id/msg_list"
			android:layout_width="match_parent"
			android:layout_height="0dip"
			android:layout_weight="1" />

		<RelativeLayout
			android:layout_width="match_parent"
			android:layout_height="wrap_content"
			android:background="@android:color/white" >
			<Button
				android:id="@+id/send_btn"
				style="?android:attr/buttonStyleSmall"
				android:layout_width="wrap_content"
				android:layout_height="wrap_content"
				android:layout_alignParentRight="true"
				android:text="Send" />
			<EditText
				android:id="@+id/msg_edit"
				android:layout_width="match_parent"
				android:layout_height="wrap_content"
				android:layout_alignBottom="@+id/send_btn"
				android:layout_toLeftOf="@+id/send_btn" >
			</EditText>
		</RelativeLayout>

	</LinearLayout>
We'll use ListFragment to implement the list view. Create a MessagesFragment class that extends ListFragment and implement LoaderCallbacks interface just like before but this time specify DataProvider.CONTENT_URI_MESSAGES as the Uri for CursorLoader.
	public class MessagesFragment extends ListFragment implements LoaderManager.LoaderCallbacks<Cursor> {

		private OnFragmentInteractionListener mListener;
		private SimpleCursorAdapter adapter;

		@Override
		public void onAttach(Activity activity) {
			super.onAttach(activity);
			try {
				mListener = (OnFragmentInteractionListener) activity;
			} catch (ClassCastException e) {
				throw new ClassCastException(activity.toString() + " must implement OnFragmentInteractionListener");
			}
		}

		@Override
		public void onCreate(Bundle savedInstanceState) {
			super.onCreate(savedInstanceState);

			adapter = new SimpleCursorAdapter(getActivity(),
					R.layout.chat_list_item,
					null,
					new String[]{DataProvider.COL_MSG, DataProvider.COL_AT},
					new int[]{R.id.text1, R.id.text2},
					0);
			adapter.setViewBinder(new SimpleCursorAdapter.ViewBinder() {

				@Override
				public boolean setViewValue(View view, Cursor cursor, int columnIndex) {
					switch(view.getId()) {
					case R.id.text1:
						LinearLayout root = (LinearLayout) view.getParent().getParent();
						if (cursor.getString(cursor.getColumnIndex(DataProvider.COL_FROM)) == null) {
							root.setGravity(Gravity.RIGHT);
							root.setPadding(50, 10, 10, 10);
						} else {
							root.setGravity(Gravity.LEFT);
							root.setPadding(10, 10, 50, 10);
						}
						break;
					}
					return false;
				}
			});
			setListAdapter(adapter);
		}

		@Override
		public void onActivityCreated(Bundle savedInstanceState) {
			super.onActivityCreated(savedInstanceState);

			Bundle args = new Bundle();
			args.putString(DataProvider.COL_EMAIL, mListener.getProfileEmail());
			getLoaderManager().initLoader(0, args, this);
		}

		@Override
		public void onDetach() {
			super.onDetach();
			mListener = null;
		}

		public interface OnFragmentInteractionListener {
			public String getProfileEmail();
		}
	}
We define an interface which an activity must implement that uses this fragment. This is how the fragment knows about the selected chat email ID.
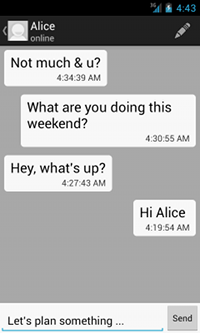
The layout for the list row is very simple. We already took care of the alignment (differentiating sent and received messages) by setting a ViewBinder to the list adapter.
<?xml version="1.0" encoding="utf-8"?>
<LinearLayout xmlns:android="http://schemas.android.com/apk/res/android"
    android:layout_width="match_parent"
    android:layout_height="match_parent" >

	<LinearLayout
	    android:layout_width="wrap_content"
	    android:layout_height="wrap_content"
	    android:orientation="vertical"
	    android:background="@drawable/box" >
	    <TextView
	        android:id="@+id/text1"
	        android:layout_width="wrap_content"
	        android:layout_height="wrap_content"
	        android:textAppearance="?android:attr/textAppearanceLarge" />
	    <TextView
	        android:id="@+id/text2"
	        android:layout_width="wrap_content"
	        android:layout_height="wrap_content"
	        android:layout_gravity="right"
	        android:textAppearance="?android:attr/textAppearanceSmall" />

	</LinearLayout>

</LinearLayout>
The rounded box as seen in the UI is obtained by specifying a shape drawable as background in the row layout. Create a box.xml file in drawable directory.
	<?xml version="1.0" encoding="utf-8"?>
	<shape xmlns:android="http://schemas.android.com/apk/res/android" >
		<solid
			android:color="@android:color/white" />
		<corners
			android:radius="5dp"/>
		<padding
			android:left="10dp"
			android:top="5dp"
			android:right="10dp"
			android:bottom="5dp" />
	</shape>
16. Chat Activity
Now that we have the layout and list fragment ready let's take a look at the activity class.
	public class ChatActivity extends Activity implements MessagesFragment.OnFragmentInteractionListener {

		private EditText msgEdit;
		private Button sendBtn;
		private String profileId, profileName, profileEmail;
		private GcmUtil gcmUtil;

		@Override
		protected void onCreate(Bundle savedInstanceState) {
			super.onCreate(savedInstanceState);
			setContentView(R.layout.activity_chat);

			profileId = getIntent().getStringExtra(Common.PROFILE_ID);
			msgEdit = (EditText) findViewById(R.id.msg_edit);
			sendBtn = (Button) findViewById(R.id.send_btn);

			sendBtn.setOnClickListener(new View.OnClickListener() {
				@Override
				public void onClick(View v) {
					send(msgEdit.getText().toString());
					msgEdit.setText(null);
				}
			});

			ActionBar actionBar = getActionBar();
			actionBar.setHomeButtonEnabled(true);
			actionBar.setDisplayHomeAsUpEnabled(true);

			Cursor c = getContentResolver().query(Uri.withAppendedPath(DataProvider.CONTENT_URI_PROFILE, profileId), null, null, null, null);
			if (c.moveToFirst()) {
				profileName = c.getString(c.getColumnIndex(DataProvider.COL_NAME));
				profileEmail = c.getString(c.getColumnIndex(DataProvider.COL_EMAIL));
				actionBar.setTitle(profileName);
			}
			actionBar.setSubtitle("connecting ...");

			registerReceiver(registrationStatusReceiver, new IntentFilter(Common.ACTION_REGISTER));
			gcmUtil = new GcmUtil(getApplicationContext());
		}

		@Override
		public String getProfileEmail() {
			return profileEmail;
		}

		@Override
		protected void onPause() {
			//reset new messages count
			ContentValues values = new ContentValues(1);
			values.put(DataProvider.COL_COUNT, 0);
			getContentResolver().update(Uri.withAppendedPath(DataProvider.CONTENT_URI_PROFILE, profileId), values, null, null);
			super.onPause();
		}

		@Override
		protected void onDestroy() {
			unregisterReceiver(registrationStatusReceiver);
			gcmUtil.cleanup();
			super.onDestroy();
		}
	}
The important piece of code is in onCreate() where we instantiate GcmUtil. This triggers registration with GCM if it's not already done. Recall that GcmUtil broadcasts the registration status which this activity registers to listen. Add this piece of code to the activity.
	private BroadcastReceiver registrationStatusReceiver = new  BroadcastReceiver() {

		@Override
		public void onReceive(Context context, Intent intent) {
			if (intent != null && Common.ACTION_REGISTER.equals(intent.getAction())) {
				switch (intent.getIntExtra(Common.EXTRA_STATUS, 100)) {
				case Common.STATUS_SUCCESS:
					getActionBar().setSubtitle("online");
					break;

				case Common.STATUS_FAILED:
					getActionBar().setSubtitle("offline");
					break;
				}
			}
		}
	};
Finally to send a message we post the data to our server asynchronously.
	private void send(final String txt) {
        new AsyncTask<Void, Void, String>() {
            @Override
            protected String doInBackground(Void... params) {
                String msg = "";
                try {
                    ServerUtilities.send(txt, profileEmail);

        			ContentValues values = new ContentValues(2);
        			values.put(DataProvider.COL_MSG, txt);
        			values.put(DataProvider.COL_TO, profileEmail);
        			getContentResolver().insert(DataProvider.CONTENT_URI_MESSAGES, values);

                } catch (IOException ex) {
                    msg = "Message could not be sent";
                }
                return msg;
            }

            @Override
            protected void onPostExecute(String msg) {
            	if (!TextUtils.isEmpty(msg)) {
            		Toast.makeText(getApplicationContext(), msg, Toast.LENGTH_LONG).show();
            	}
            }
        }.execute(null, null, null);
	}
We omitted few details such as the edit contact dialog which is similar to the add contact dialog discussed earlier.